Documentation
The documentation below describes Maintenance Release %XX%. Click here for the documentation on the latest software version.
... configure call forwarding?
... define a time period using the wizard?
... create extra DIDs as aliases?
... limit the number of concurrent calls for a specific customer?
... configure call forwarding?
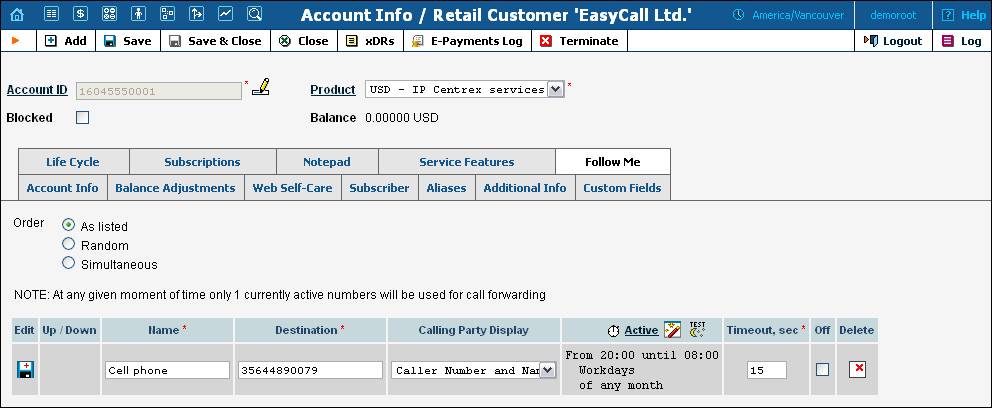
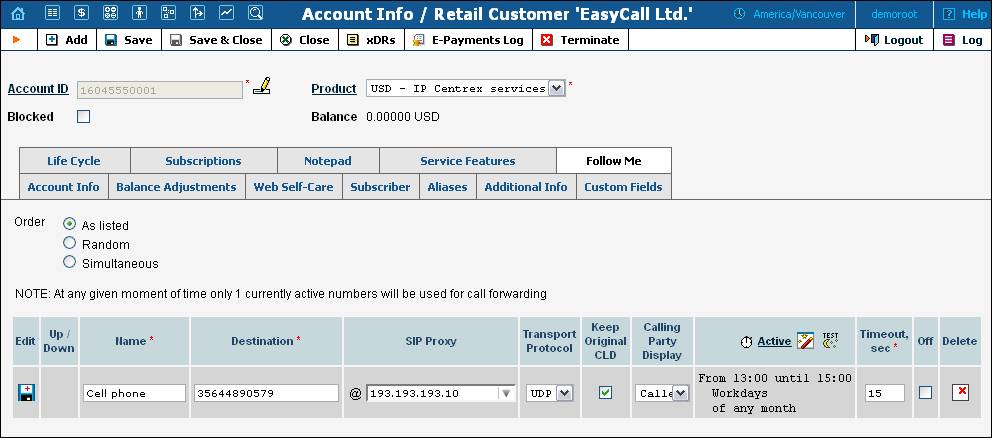
Using follow-me you can forward calls to multiple destinations. You can also configure it so that each of these destinations will be active in its own time period. For example, let’s suppose you want to redirect all your calls from 8 pm till 8 am to your cell phone (e.g. 35644890079) in case your IP phone is offline.
1. In the Help Desk section of the Admin-Index page, choose Account Info and search for the desired account.
2. Go to the Service Features tab to enable forwarding:
o Forward Mode – Specify Follow-Me.
o Default Answering Mode – Specify Forward only.
![]()
3. The additional Follow-Me tab now appears on the screen. Choose this tab.
4. Click ![]() Add to add the number on which you want to receive forwarded calls.
Add to add the number on which you want to receive forwarded calls.
![]()
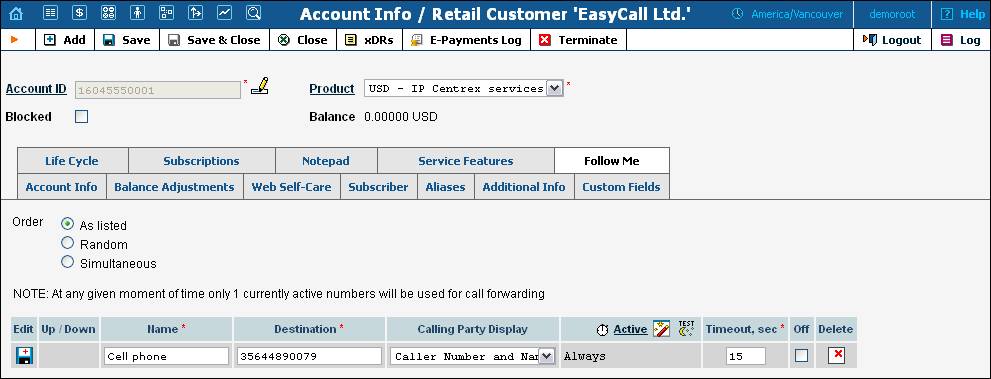
5. Enter the following information:
· Order - Select the order for redirecting a call:
o If you set As Listed, then every active number will be called, from the first number to the last one.
o If you would like to call all numbers from the list simultaneously, use Simultaneous.
o For random order, select Random.
· Name – Type in a name for the follow-me number (the cell phone number in the example).
· Destination – Enter a number for redirecting calls (e.g. 35644890078).
· Calling Party Display – Choose how to display the caller’s info during forwarding:
o Select Caller Number and Name to see the phone number and the name of the original caller.
o If you choose Caller Number and Forwarder Name, then the phone number of the caller and the forwarder’s name will be displayed.
o To see the phone number and the name of the forwarder, select Forwarder Number and Name.
· Active – Define the period when the number is active and is allowed to receive a forwarded call. Click the Active link or wizard ![]() icon to create a period. If you want the follow-me number to be active permanently, click the Always button while on the Period Wizard page. See the ... define a time period using the wizard? section for more details.
icon to create a period. If you want the follow-me number to be active permanently, click the Always button while on the Period Wizard page. See the ... define a time period using the wizard? section for more details.
· Timeout – Set the amount of seconds to wait before a call is forwarded to the next number in the list if the call is not answered.
· Off – If you wish to temporarily disable forwarding to this follow-me number, check this option.
![]()
6. Click the ![]() Save icon to save the results of your work.
Save icon to save the results of your work.
7. Repeat steps 5-7 until all the desired follow-me numbers have been added.
This is similar to follow-me mode, but has a few extra options that allow you to route calls to SIP URI. For example, suppose you want to redirect your calls to SIP URI from 1 pm till 3 pm. To do this, follow the steps below:
1. In the Help Desk section of the Admin-Index page, choose Account Info and search for the desired account.
2. Go to the Service Features tab to enable forwarding:
o Forward Mode – Specify Advanced Forwarding.
o Default Answering Mode – Specify the method of processing incoming calls. Choose Forward only if you do not want the call to go to voicemail if not answered. Otherwise, choose Forward then voicemail here.
![]()
3. The additional Follow Me tab now appears on the screen. Choose this tab.
4. Click ![]() Add to add the number on which you want to receive forwarded calls.
Add to add the number on which you want to receive forwarded calls.
5. Enter the information needed. The fields are very similar to those for adding a follow-me number as described above.
6. Below are additional fields that are not available when adding a follow-me number.
· SIP Proxy – Select SIP proxies from the drop-down menu (SIP proxies available for a certain customer should be specified on the customer’s Permitted SIP Proxies tab).
· Transport Protocol - Enables you to choose the UDP or TCP transport protocol. You can use the TCP protocol instead of UDP for SIP communications for PBXs which do not support UDP.
· Keep Original CLD – Check this option to ensure that the originally dialed number is present in the call information when forwarding a call to another account.
![]()
7. Click the ![]() Save icon to save the results of your work.
Save icon to save the results of your work.
The simplest type of forwarding is when you specify a single phone number to which all calls will be sent. For example, if you wish to redirect all your calls to 12777900011, use simple forwarding.
1. In the Help Desk section of the Admin-Index page, choose Account Info and search for the desired account.
2. Go to the Service Features tab to enable forwarding:
o Forward Mode – Select Simple Forwarding.
o Default Answering Mode – Specify Forward only.
![]()
3. Go to the Forward tab.
4. Click ![]() Add to add the number on which you want to receive forwarded calls.
Add to add the number on which you want to receive forwarded calls.
5. Enter the following information:
· Forward To – The number you wish the calls to be forwarded to.
· Timeout – Set how long the IP phone will ring before a call goes to voicemail (if Forward then voicemail is set in the Default Answering Mode field) or is disconnected.
· Keep Original CLD – If this is checked, then the originally dialed number will be preserved during forwarding.
· Calling Party Display – Choose one of the ways to display the caller’s info during forwarding (a detailed description of each option is given above).
· Limit Simultaneous Calls To – Specify the allowed number of concurrent calls here. When an account tries to place a call beyond the allowed limit, it will be rejected.
6. Click the ![]() Save icon.
Save icon.
Using the auto attendant feature, you can easily configure a voice menu.
1. In the Help Desk section of the Admin-Index page, choose Account Info and search for the desired account.
2. Go to the Service Features tab and click on Incoming Calls.
![]()
![]()
![]()
3. To access the unified messaging system for this account, check the box next to UM Enabled. To go directly to voicemail, select Voicemail only from the Default Answering Mode drop-down list. Then click ![]() Save.
Save.
![]()

4. Once this is done, the Manage UM Account link appears. Click on this link to go to the account’s UM administration page.
5. From the Options functional block, choose UM Preferences. On the UM Preferences page, go to the Mode tab and choose Auto Attendant. Then click Save & Close.
![]()

6. To go to the Auto Attendant page, choose Auto Attendant from the Options functional block.
7. To create a new voice menu, click ![]() Add in the toolbar.
Add in the toolbar.
![]()

8. Enter the following information:
o Name – A logical name for the menu (e.g. Support for the support department).
o Active – Define the period when the menu is active. Click the wizard ![]() icon to create a period. If you want the menu to be active permanently, click the Always button next to it.
icon to create a period. If you want the menu to be active permanently, click the Always button next to it.
o Intro – The prompt played when the menu is entered for the first time (e.g. “Welcome to the PortaOne support department”). If you choose None, there will be no welcome message played. Choose Custom and click on Browse to select the needed file.
o Timeout – If no input is received and the Standard option is selected, then the Default prompt will be played. Choose Custom to use your own prompt.
o Menu – A menu prompt. Choose None if you would like to omit this step, otherwise use Custom. In this case, the user will hear all the available options (e.g. “Press 1 for operator, press 2 for support”).
o Unavailable – If the Unavailable option is selected, the user will hear either the default prompt (if you choose the Standard prompt) or a custom one. For the latter case, choose Custom.
9. Choose the desired action for the specified events (e.g. you would like to set transfer as the second event and play the prompt before this action).
1. Next to the second event in the Action column, choose Transfer.
2. In the Destination column, specify the number you would like to transfer the call to.
3. Check the Play Before Action box next to this row, since you would like to play the prompt before the transfer (e.g. “Thank you for contacting the support department”). You can either record the prompt (using the ![]() ,
, ![]() and
and ![]() icons) or upload an existing file (just click Browse… on the right and then choose the appropriate file).
icons) or upload an existing file (just click Browse… on the right and then choose the appropriate file).
4. Repeat steps 1-3 to define actions for the remaining events.
Please consult the Auto-Attendant chapter in the PortaUM Administrator Guide for a detailed description of all the parameters available here.
10. Click ![]() Save & Close.
Save & Close.

... define a time period using the wizard?
Using the period definition wizard, you can easily define the time period when a number (e.g. a follow-me number) will be active. If you want the number to be active permanently, click the Always button at the bottom of the Period Wizard page. Otherwise, define the desired period. The following example illustrates the process of creating a period that starts at 8pm and lasts until 8am the next morning on workdays.
1. On the first page of the wizard, select 8 pm in the From box and 8 am in the Until box. Then click Next.
2. Select Workdays in the Day of week box and click Next to go to the next page.
3. Click Skip on the following two pages defining Day of month and Month.
![]()
![]()
![]()
4. Click Finish to complete the period definition. If you wish to set one more definition for this period, click Add another definition to this period.
... create extra DIDs as aliases?
For example, if you want to route DIDs 12061234567, 18007778881 and 4412345678 to the IP PBX, add them as aliases with the Allow authentication / registration parameter set to “No.” (You may want to use the Alias Generator to create multiple aliases).
1. Open the Account Info form for an existing account, and go to the Aliases tab:
![]()
![]()
![]()
2. Click ![]() Add to create a new alias for the current account.
Add to create a new alias for the current account.
3. Specify a DID number in the Alias ID field.
4. Click ![]() Save.
Save.
5. Repeat steps 2-4 to add additional aliases.
6. Click ![]() Save & Close.
Save & Close.
... limit the number of concurrent calls for a specific customer?
1. In the Participants section of the Admin-Index page, choose Customers.
2. On the Customer Management page, choose the specified customer.
3. Click on the ![]() Sites button.
Sites button.
4. On the Customer Sites page, click on the Default Site link.
5. Choose Yes from the Limit Simultaneous Calls drop-down list.
6. Define the Max Number of Simultaneous Calls parameter to allow up to a specific number of concurrent calls for the accounts of this customer.
![]()
7. Click ![]() Save & Close.
Save & Close.