Documentation
The documentation below describes Maintenance Release %XX%. Click here for the documentation on the latest software version.
General Configuration of Callback Services
Modify Voice Application Settings
Add a New Email Callback Trigger Instance
Configure the Instance Parameters
Email Callback
Email callback is a variation of the Web callback. However, instead of entering a web page, an end user sends an email with the account credentials (login and password) and two phone numbers: a phone number where the user can be reached and the destination number he wishes to be connected with. He then receives the call and is connected with the destination number provided in the email.
The advantage of this type of callback is the availability of making calls in places where users are not permitted to browse the web, but can still send and receive emails (e.g. in some office environments).
This chapter demonstrates how to configure and use Email callback.
Consider the following example:
A user from Poland needs to call his relatives in Germany. He sends an email providing both his phone number and that of his relatives. He receives a callback and is connected with Germany.
Print the following page and use it to mark the operations you have completed while performing the system setup according to the instructions in this chapter. Please make sure that you perform all of the operations in the order designated (all of the boxes should be checked), otherwise the service will not work.
|
Operation |
Done |
|
General Configuration |
|
|
Perform the general configuration of callback services |
[ ] |
|
Voice Application configuration |
|
|
Modify voice applications settings |
[ ] |
|
Add a new Email callback trigger instance |
[ ] |
|
Configure the parameters of the Email callback trigger instance |
[ ] |
|
Rating configuration (Customer) |
|
|
Create a tariff A, which will be applied to the end users for using callback |
[ ] |
|
Insert rates in tariff A for the destinations the callback will be initiated to (legA,) and to which your customers will make outgoing calls (legB) |
[ ] |
|
Create a product for callback services |
[ ] |
|
In the rating list (of the callback product) include an entry that will contain the PortaUM® node and the tariff A containing the callback calling rates |
[ ] |
|
In the rating list (of the callback product) include another entry associating the Voice calls service, tariff A and the CALLBACK_FAIL access code |
[ ] |
|
Account provisioning |
|
|
Create a retail customer who owns the accounts for callback services |
[ ] |
|
Generate a batch of accounts (PINs) for this customer |
[ ] |
|
Testing |
|
|
Send an email and make a test callback call |
[ ] |
General Configuration of Callback Services
Follow the steps described in the Setting up Callback Services. General Configuration handbook that describes the initial instructions for configuring callback services.
Modify Voice Application Settings
Email callback means that users can send emails to a special email address (e.g. callback@yourdomain.com,) with the domain name of your PortaSIP® Media Server (your PortaUM® node).
At this point it is necessary to associate the domain name with the PortaSIP® Media Server.
![]() Important: prior to defining the domain name in PortaSwitch®, make sure this domain name is assigned to the PortaSIP® Media Server’s IP address on your DNS server. Also, make sure you have created an MX (mail exchanger) record for this domain name.
Important: prior to defining the domain name in PortaSwitch®, make sure this domain name is assigned to the PortaSIP® Media Server’s IP address on your DNS server. Also, make sure you have created an MX (mail exchanger) record for this domain name.
Please refer to the instructions in the Setting up and Using UM Services handbook for a detailed description of the PortaSIP® Media Server domain name definition.
![]() Make sure the above-defined domain name is included in the list of Exim mail client’s permitted domain names. To do this, login to your PortaSIP® Media Server using ssh and check the /pum_domainlist_for_mta file. You will see content similar to this:
Make sure the above-defined domain name is included in the list of Exim mail client’s permitted domain names. To do this, login to your PortaSIP® Media Server using ssh and check the /pum_domainlist_for_mta file. You will see content similar to this:
> less /home/porta-um/etc/pum_domainlist_for_mta
: 193.28.87.227 : demoum.portaone.com
Add a New Email Callback Trigger Instance
1. In the Routing section of Admin-Index, choose IVR Applications.
2. Click Voice Applications Settings.


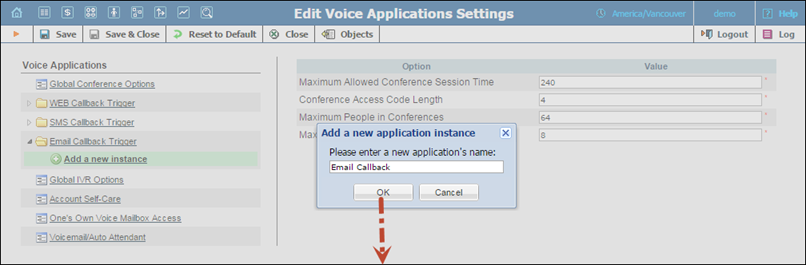
3. Click ![]() Add a new instance under the Email callback trigger menu and type the name of the instance in the dialog box.
Add a new instance under the Email callback trigger menu and type the name of the instance in the dialog box.
4. Click OK.
Configure the Instance Parameters
1. Select the Email Callback Trigger instance you just created.
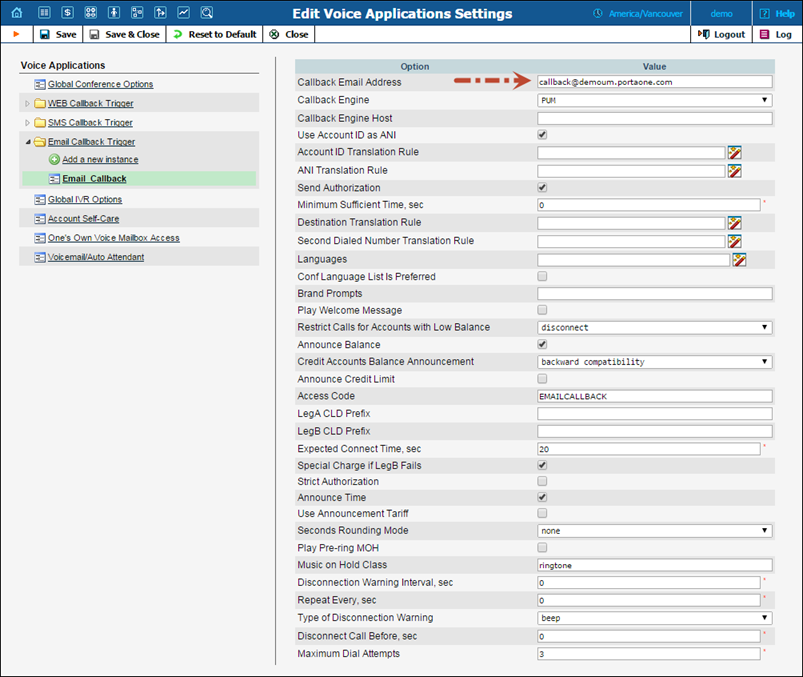
2. Fill in the following information:
· Callback Email Address – Specify the email address for the PortaSIP® Media Server where end users send emails to initiate callback calls in this format: callback@<host> where host is either a domain name or an IP Address of your PortaSIP® Media Server (your PortaUM® Node).
· Callback Engine – Select PUM here.
· Use Account ID as ANI – Select this check box to show the account ID (i.e. PIN) as the calling number.
· ANI Translation Rule – Specify the translation rule as a Perl expression that will convert the number of the calling party. This rule will be applied to the number if the option Use Account ID as ANI is selected.
· Special Charge if LegB Fails – When this check box is selected, a special tariff will be used to charge for legA if a call to a destination number (legB) cannot be established (e.g. if the destination number is busy or not answering).
· Access Code – Specify the access code that will allow the PortaBilling® to use a special tariff for callback charging. For Email callback the default access code value is: EMAILCALLBACK.
3. Click ![]() Save & Close.
Save & Close.
NOTE: There is a helpful tool-tip for each option. Just point your mouse to the desired option to bring it up.
Now it is necessary to create a tariff according to which your customers will be charged for using the callback services.
A callback call consists of two parts (call legs): a call to the calling party (legA) and a call to the destination number (legB), therefore this tariff will be used to create charges for both call legs. The total charge for the entire callback call is the sum of charges for call legA and call legB.

1. In the Rating section of the Admin-Index page, choose Tariffs.
2. On the Tariff Management page, choose ![]() Add.
Add.
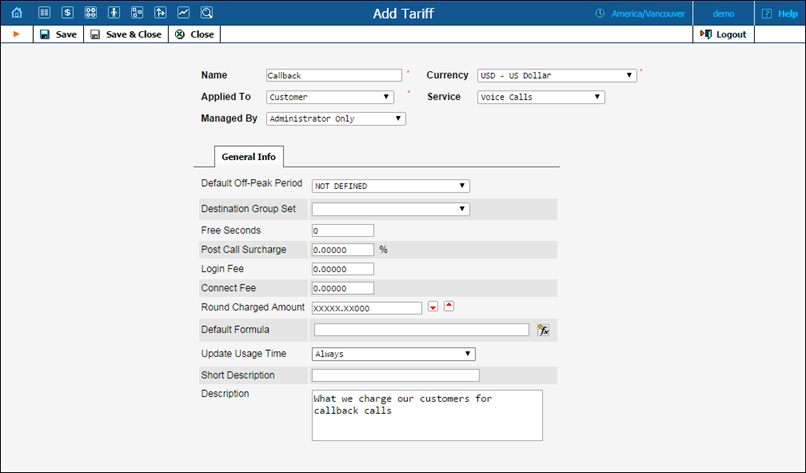
3. Fill in the Add Tariff form:
· Name – A short name for the tariff object; this is the name you will see in the select menus.
· Currency – Indicates the currency in which you charge your customers.
NOTE: The currency for the tariff can only be chosen once; it cannot be changed later.
· Applied To – Choose “Customer,” as this tariff will be used to charge your customers.
· Managed By – Choose Administrator only here.
· Service – Choose Voice Calls.
4. Click ![]() Save&Close.
Save&Close.
NOTE: You can charge separately for call legs. Please refer to the How to section for a detailed description of the necessary steps for setting this up.
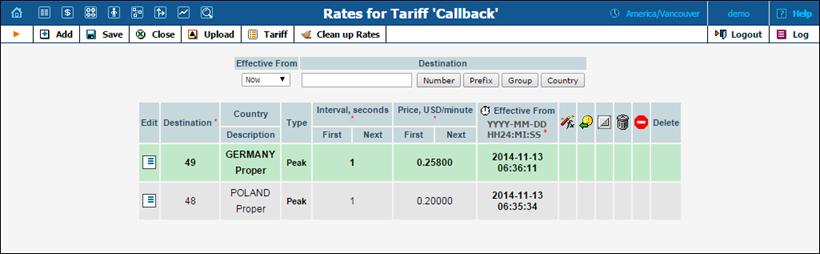
Since a callback call consists of two call legs, rates for both call leg destinations need to be entered into the tariff.

1. While on the Tariff Management screen, click the ![]() Rates icon.
Rates icon.
2. On the Edit Rates screen, click ![]() Add.
Add.
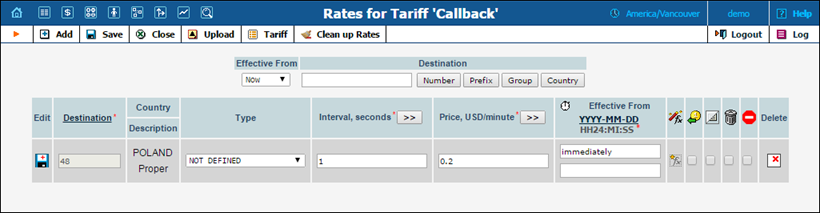
3. Fill in the required information:
· Destination – A destination prefix may be entered directly (e.g. 48 for Poland) or you can access the destinations directory by clicking the Destination link (in the column header). Here you will find the desired prefix by country name.
NOTE: You should create an entry for the phone prefixes in the Destination register before creating a rate for them in the tariff.
· Interval First – first billing unit in seconds.
· Interval Next – next billing unit in seconds.
· Price First – per minute price for first interval.
· Price Next – per minute price for next interval.
4. Click the ![]() Save button in the toolbar, or the
Save button in the toolbar, or the ![]() icon on the left side of the row.
icon on the left side of the row.
5. Repeat these steps to enter more rates.
Accounts for accessing callback services have a specific product assigned to them. Products are powerful tools that define different ways for billing accounts. Product definition is always done using these steps: product type definition, service definition and configuration and creation of a rating list.

In the Rating section of the Admin-Index page, choose Products.
1. On the Product Management page, click the ![]() Add icon.
Add icon.
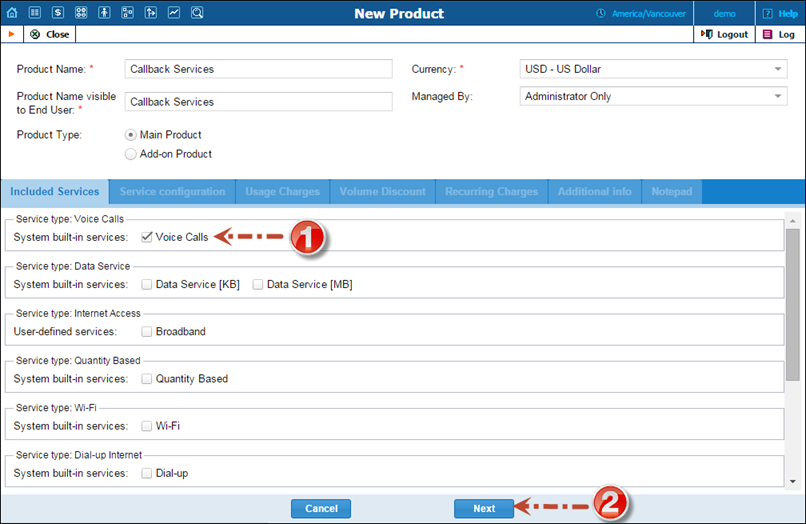
2. Fill in the “New Product” form:
· Product Name – Type in the internal name of the product.
· Product Name Visible to End User – Specify the name of the product that your customers will see on their self-care interface.
· Currency – Specify the product currency; only tariffs which have the same currency will be permitted in the rating list.
· Product Type – Choose Main Product here.
Included services tab
· Service Type – Select the Voice Calls check box.
· Click Next.
NOTE: When Next is clicked, the product and all of the changes performed to its configuration are saved.
Service configuration tab
Leave the values of service attributes for this product as is and click Next.
Usage Charges tab
The rating list has two functions: it defines permitted access points (nodes and access numbers) and specifies which tariff should be used for billing in each of these points.
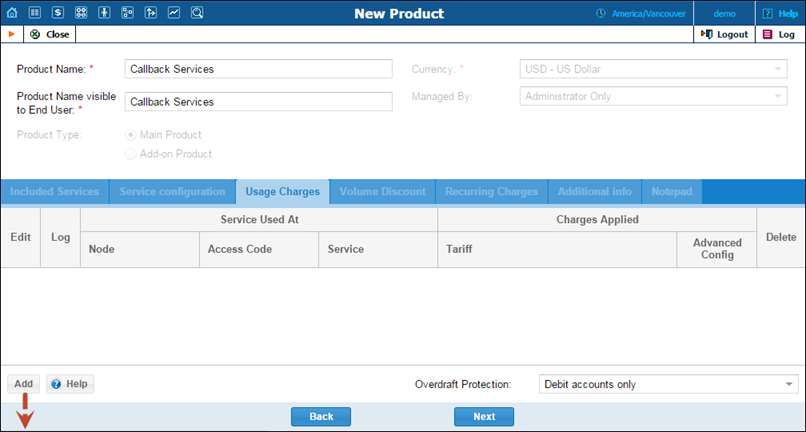
1. When the Usage Charges tab is selected, click Add.
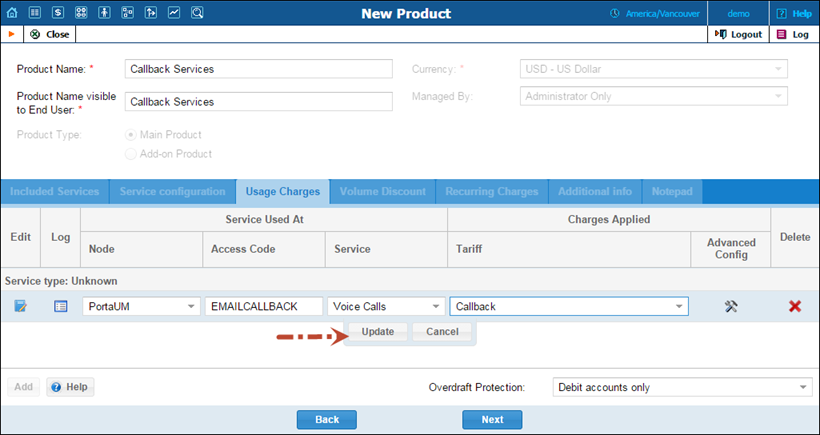
2. Fill in the required information:
· Node – Select the PortaUM® node.
· Access Code – Type in the EMAILCALLBACK access code here as it was specified in the Email callback trigger instance above. You can also leave this field empty and the system will automatically select this tariff when charging for Email callback services.
· Service – Choose Voice Calls.
· Tariff – Select the tariff for the Email callback you just created.
· Click Update.
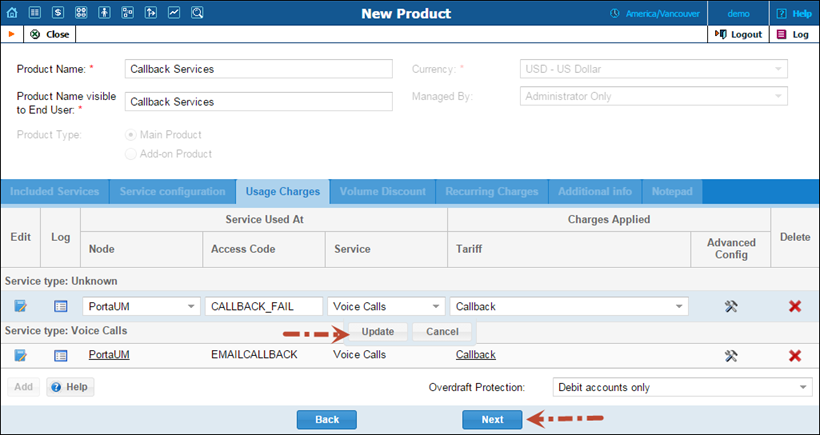
3. Click Add to enter another rating entry. This rating entry will define which tariff should be selected if one of the call legs fails to be established (e.g. if the destination number is busy or doesn’t answer).
4. Fill in the required information:
· Node – Select the PortaUM® node.
· Access Code – Type in the CALLBACK_FAIL access code here.
· Service – Choose Voice Calls.
· Tariff – Select the tariff for Email callback you have just created.
NOTE: You can use a special tariff for this rating entry (e.g. if you do not charge your customers for unsuccessful calls to destination numbers, create a separate tariff and enter a rate of zero for a “|” wildcard destination in it). Find the description of the tariff creation and rates enter in the sections above.
5. Click Update.
6. Click Next.
Volume Discount tab
This tab allows you to assign volume discount plans to the product. Choose None since no volume discount plan is specified for this service. Click Next.
Recurring Charges tab
This tab allows you to define a subscription plan that is mandatory for this product so that it is automatically applied to every account that is assigned this product. Skip this step for now and click Next.
Additional Info tab
· Breakage – Specify the minimum amount of funds the account should have to be able to use services.
· Description Visible to End User – Provide a product description to be shown to end users on their self-care interfaces.
· Description – Your internal comments about the intended use of this product.
· Click Next.
Notepad tab
Leave your notes about this product. Insert a timestamp (current time in your time zone) by clicking Time Stamp.
7. Click Done.
A customer owns their accounts. As a rule, Callback is provided as a prepaid service, so invoices are not issued. However, you will still need at least one customer object in order to keep all the accounts organized in one location.
In the Participants section of the Admin-Index, choose Customers.
1. On the Customer Management page, click ![]() Add Customer (In this example, we assume that you are manually creating the customer, so choose Manually from the list and do not use any of the Quick Form options).
Add Customer (In this example, we assume that you are manually creating the customer, so choose Manually from the list and do not use any of the Quick Form options).
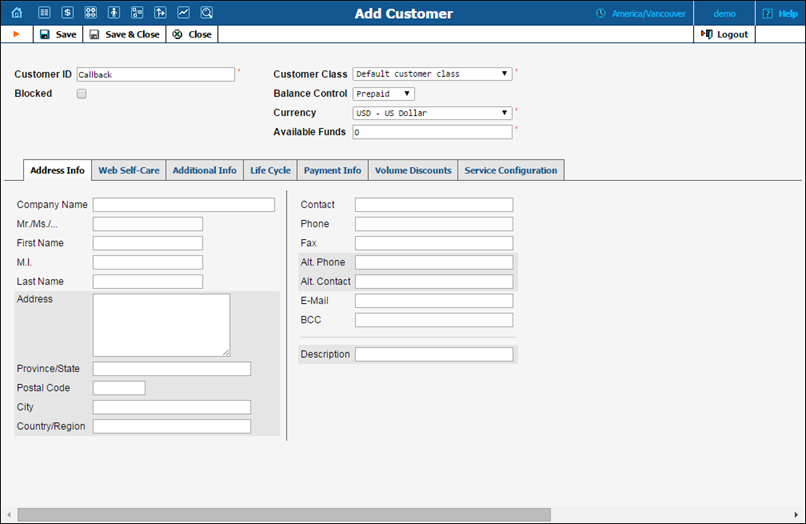
2. Fill in the New Customer form. Please note that there are several tabs with extra information available on the screen. The most important fields are:
Main form (top)
· Customer ID – Short name for the customer object; will be used on the web interface.
· Customer Class – Choose Default customer class, since invoicing and payment collection parameters defined by customer class are not really applicable to this customer, who is merely a placeholder for prepaid calling card accounts.
· Balance Control – Choose Prepaid from the list.
· Currency – The currency in which the prepaid cards will be generated.
· Available Funds – Since this customer is used as a placeholder for storing accounts, the amount of available funds is insignificant. Type zero here.
3. Click ![]() Save&Close.
Save&Close.
NOTE: Before generating accounts for a production system, read the Provisioning Prepaid Accounts section.
1. Go to the Customers screen (the screen that contains a list of customers). It should resemble the screenshot below:
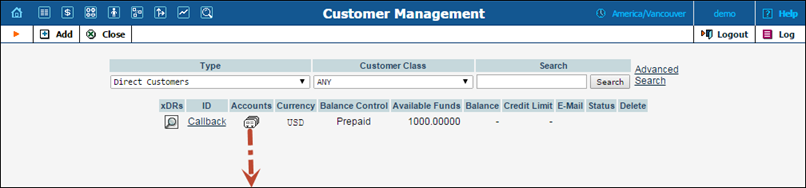

2. Next to the customer name, click on the Account ![]() or
or ![]() icon (the one in the Accounts column), which will take you to the account management for that customer.
icon (the one in the Accounts column), which will take you to the account management for that customer.
3. Click on the Account Generator.
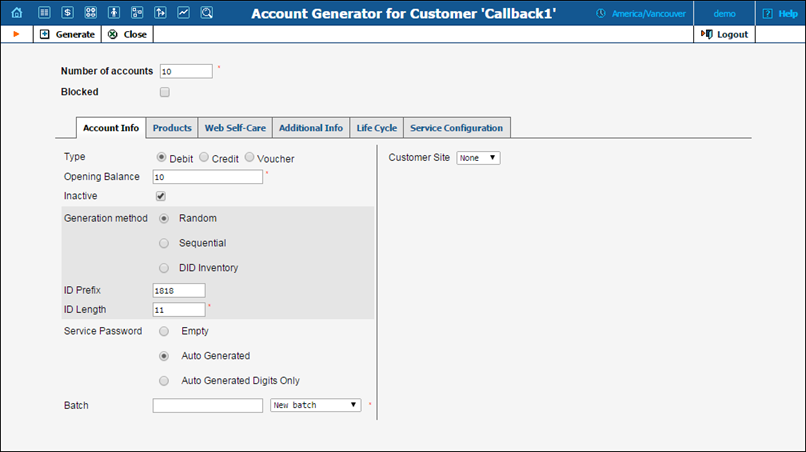
4. Fill in the “Account Generator” form:
· Number of accounts – Number of accounts (callback cards) to be generated.
· Opening balance – The initial balance on the card.
Account info tab
· Account type – Account type; select Debit for prepaid service.
· Inactive – Calling cards are generated as inactive so they cannot be misused before being sold to the dealer or end customer. You can always activate either an entire batch of cards or an individual card later on. If you plan to assign the cards to a distributor later on, the cards must be generated as inactive.
· Generation method – Choose Random here; this assigns every account a unique, randomly-generated PIN.
· ID prefix – If you would like all of the generated accounts to start with the same digit string (e.g. 11), enter it here. Thus, if you enter 12 and an ID length of 9, account IDs (PINs) will look like this: 12NNNNNNN, where N = random digits.
· ID length – All account IDs (PINs) will be numerical and of the specified length. In order to avoid problems with printing the cards, PortaBilling® will not generate account numbers with a zero leading the sequence. Also, PortaBilling® will only generate a batch with feasible parameters, e.g. it is impossible to generate a batch of 1,000 accounts with ID length 4 and ID starting at 55.
· Service Password – The Email callback module uses full account information, i.e. account ID and password for authentication. Click Random to have service passwords generated automatically for accounts.
· Batch – Accounts are grouped into batches for easy account management. If a new batch name is provided in the text field, all accounts will be placed in a new batch with the given name. Otherwise, an existing batch should be selected from the list.
Products tab
· Main Product – Choose the main product you have created for callback services.
WEB Self-care tab
· Login – If you choose Account ID (default), your end user will use his account ID (PIN) to login to the self-care pages. If you choose Empty, the account owner will not be able to use the self-care pages until a login has been assigned for his account.
· Password – Auto-generated means that a random password for web access will be automatically assigned for each account (these passwords will be included in the .CSV file with the account information). Empty means that no password will be assigned, so account owners will be able to login to the web interface simply by providing their account ID (PIN).
· Time Zone – When an account owner accesses the web self-care page to see a list of his calls, the time will be shown in the time zone most appropriate for him.
· Web Interface Language – The language to be used on the account self-care web interface.
Additional Info tab
· E-Commerce Enabled – If checked, this will allow debit card owners to make online payments via the PortaBilling® web interface. (Leave unchecked.)
Life Cycle tab
· Activation Date – The date from which the account is usable.
· Specific Date – Identifies the date that the account expires.
· ____days after First Use – Defines the number of days the account remains active after its first use or recharge.
· ____days after Last Use – Defines the number of days the account remains active after its last use or recharge.
If you do not want to use these features, leave the fields blank.
5. Click ![]() Generate; a confirmation screen will indicate that your information has been accepted.
Generate; a confirmation screen will indicate that your information has been accepted.
6. Click ![]() Close to return to the account administration page.
Close to return to the account administration page.
NOTE: Account generation tasks are executed every few minutes, so it may take a while to generate large numbers of accounts.
![]() Notification about the cards generated will be sent by email to the user who created them. A CSV file with information about the new accounts will be attached to that email.
Notification about the cards generated will be sent by email to the user who created them. A CSV file with information about the new accounts will be attached to that email.
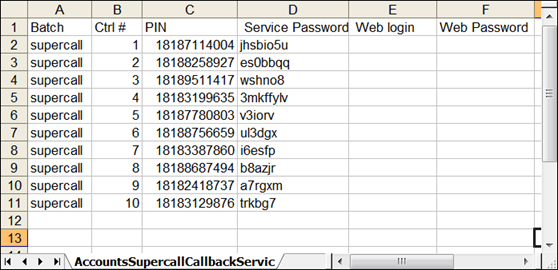
![]() In case the original email message is lost or accidentally deleted, the file containing generated accounts is stored on the slave PortaBilling® server in the user /porta_var/<Server_IP>/ directory, sub-directory cards.
In case the original email message is lost or accidentally deleted, the file containing generated accounts is stored on the slave PortaBilling® server in the user /porta_var/<Server_IP>/ directory, sub-directory cards.
Create an email and send it to the email address specified in the Email callback trigger instance (e.g. callback@demoum.portaone.com).
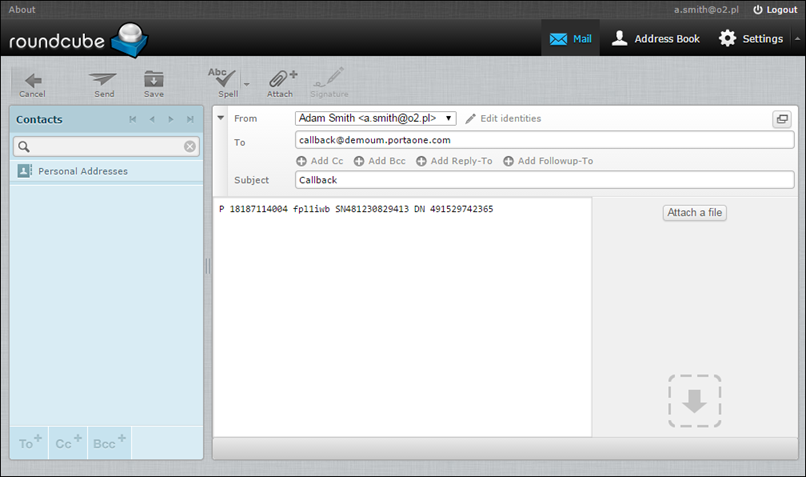
1. Specify the following information in the email:
o Subject – Type in Callback.
o Message – Type in the following information: P AAAA YYYY SN XXXXXXXX DN NNNNNNNN, where
AAAA is your callback account;
YYYY is the service password;
XXXXXXXX is the phone number to which the callback should be established;
NNNNNNNN is the destination number.
2. Click Send.
3. Wait for a call to your phone number.