Different types of users have different responsibilities within the billing system. Some users may not be allowed to use or see certain portions of the system. To this end, PortaBilling® supports the concept of Access Control Lists (ACL). ACLs allow the PortaBilling® administrator to decide, for example, that a particular sales representative can look at customers’ data, but cannot create new customers.
ACLs allow you to control what users of your site can and cannot do. Without such restrictions, it is almost impossible to guarantee that users will see or change only the information that they are allowed to.
There are default ACLs defined in the PortaBilling® system. You can use default ACLs or create new ones to fit your needs.
An access level can be of the following types:
These access levels are composed of permissions and, optionally, other components (as dependencies). Permission is a basic unit in the ACL system.
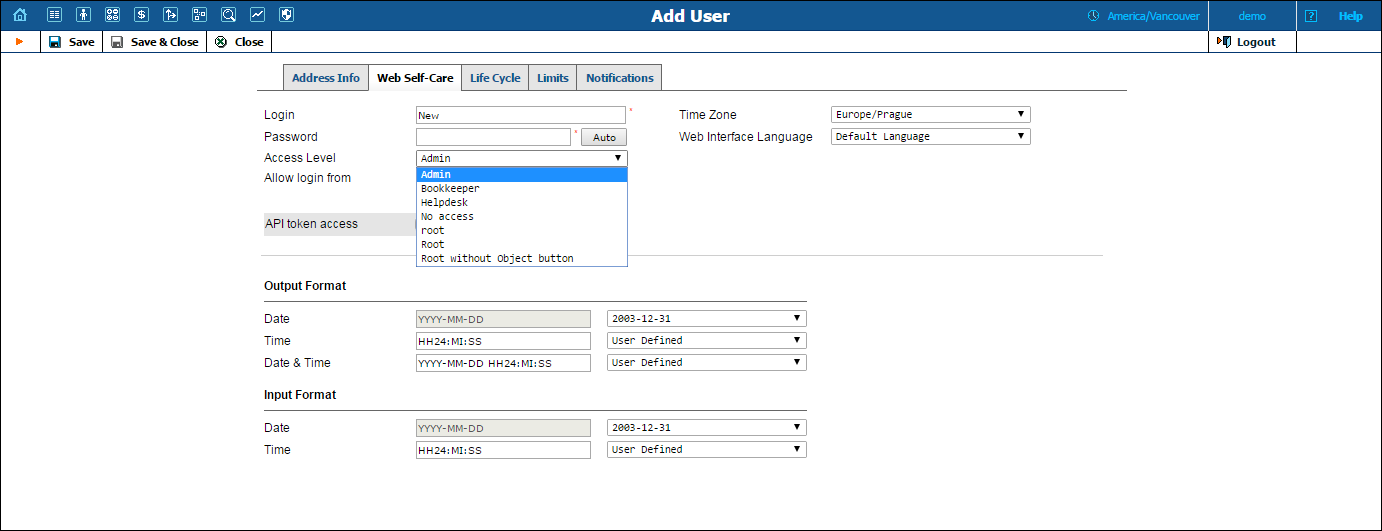
Newly created ACLs will be available in the Access Level select menu of the corresponding form when creating a new object or modifying an existing object’s details. For instance, a User ACL will appear in the Access Level select menu of the Add User form (see below), a Customer ACL will be available when creating or editing a customer, and so on.
Normally you would not want reseller A to be able to use ACLs, which were designed for reseller B. To ensure that this never happens, ACLs are not visible to resellers by default. To allow a certain reseller to use the ACL, include this reseller in the ACL’s Visible To tab.
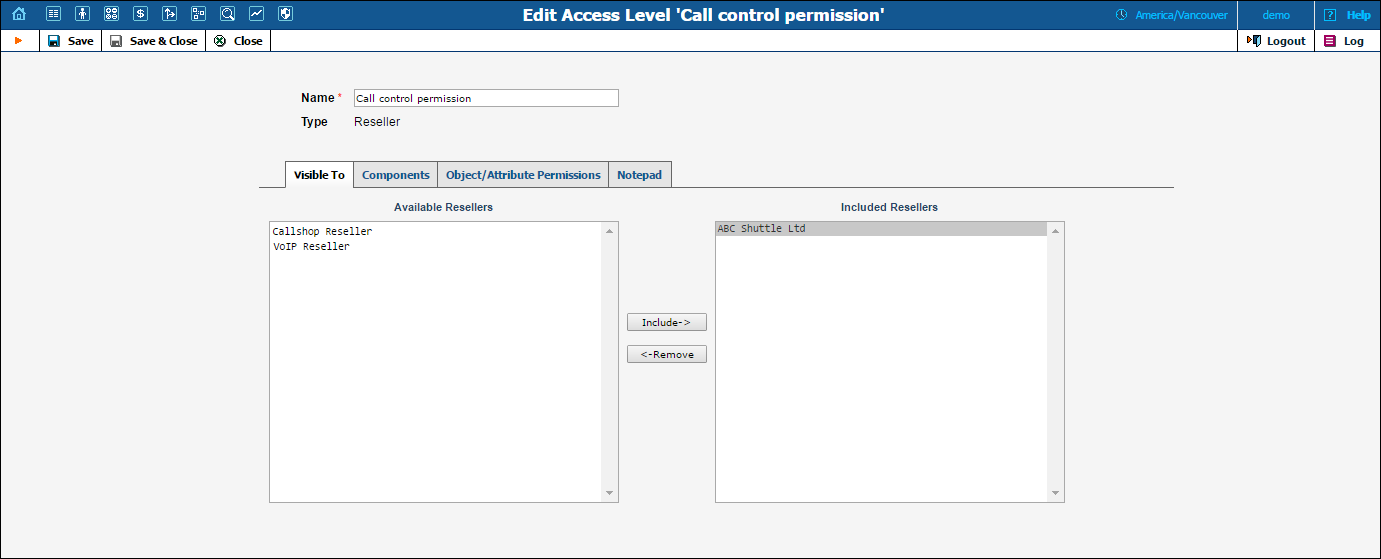
Visibility can be applied for Customers, Accounts, Representatives and CC Staff ACLs.
As was mentioned before the system includes a set of default ACLs that consists of components. These are used as a building block for constructing other access levels. Components will be made up of zero or more permissions, and can include other components (as dependencies). If access level ACLX includes access levels ACL1, ACL2 and ACL3 (or, in other words, is derived from ACL1, ACL2 and ACL3), then ACLX will contain all the permissions defined in ACL1, ACL2 and ACL3 (along with all of the access levels they in turn are derived from).
What happens if there is a contradiction; for example, if ACL1 denies read access to Accounts.password and ACL2 grants it? In such a case, the first available definition will be used. Thus, in the example above, access will be denied according to ACL1, which is first in the list of included access levels. Keep in mind that the sequence of ACLs matching is held top-down. In addition to these, a component has several other aspects.
When editing a component, you will first see a page as on the following screenshot:
Including components as dependencies within other components gives the system its power. Here we see that the “Admin access” level is defined by over a dozen dependent components. Note that this component does not actually define permission itself, but rather relies on the implementation of its dependents.
By deriving new components from the existing ones in the system, you can implement fine-grain access control and define User ACLs specific to your operational environment.
Permission is the fundamental unit of exchange in the PortaBilling® security model. Permissions are composed of an access type, Allow / Deny permission (whether or not this is an allowed action), the relevant object, and the relative attribute of the object. To browse the permissions available for a certain page on the web interface, click the Objects icon.
NOTE: The Objects icon is available for Root users only.
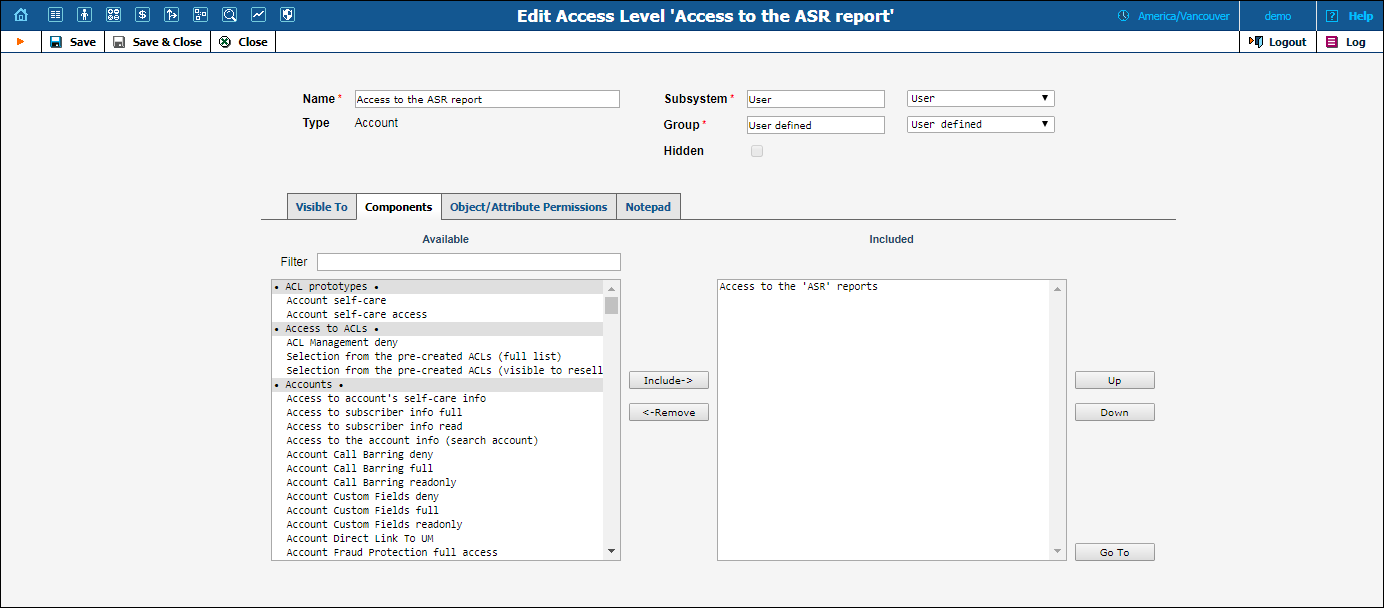
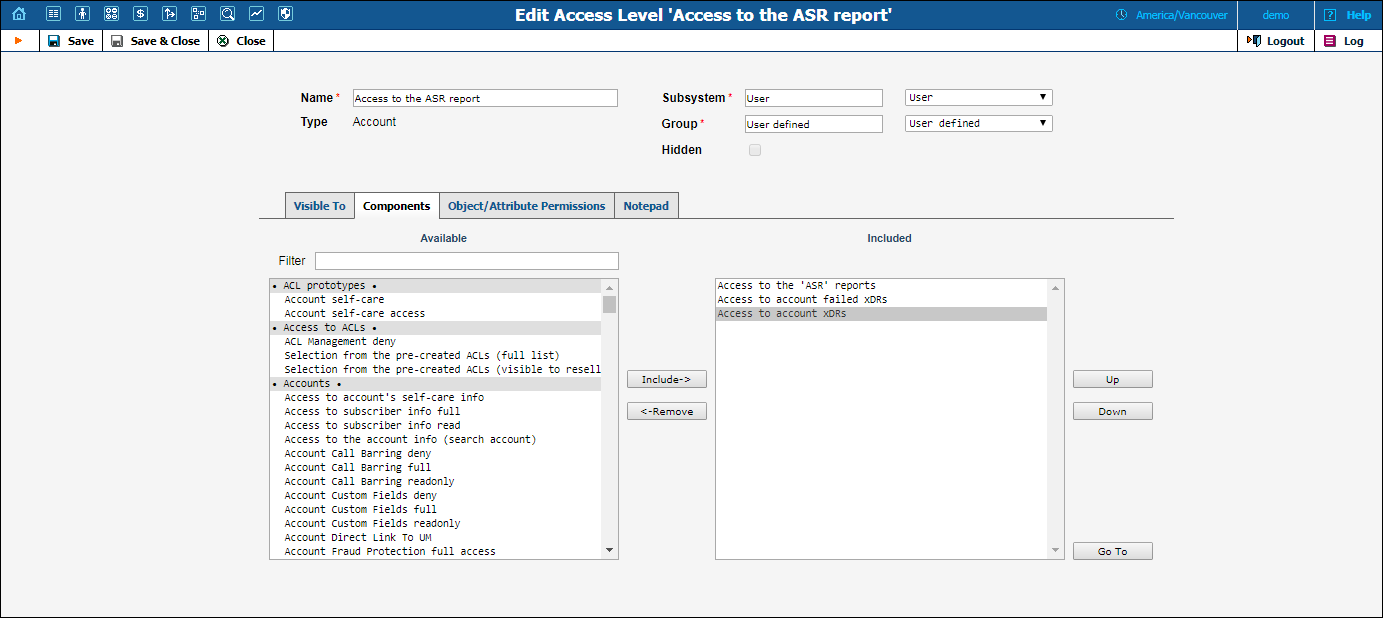
Let’s take the example. An access level called “Access to ASR reports” is provided within the PortaBilling® installation. It defines only one permission, which appears as in the following screenshot:
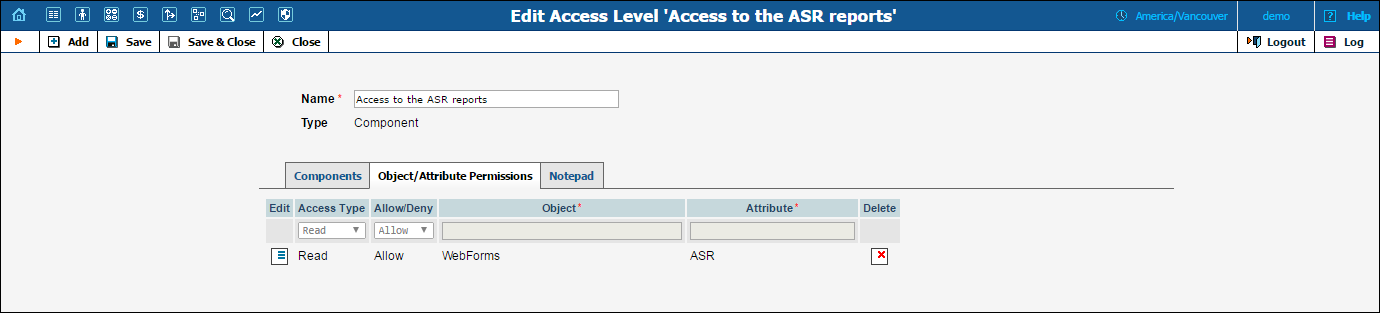
The “Access type” is set to “Read”, and the permission to “Allow”. This permission applies only to “WebForms” objects which have the attribute “ASR”.
There are four possible access types:
The Allow / Deny defines whether this permission has been granted or withheld.
You should never have to provide fine-grain permission information yourself, as all possible permissions are already encapsulated in the components of your PortaBilling® installation. For this reason, we will not discuss the “Object” and “Attribute” fields further in this section. However, it may be useful to know that wildcards can be used in these fields. For example, to allow Read access to all web pages, an ACL could be defined with the following permissions:
Access type: “Read”
Allow/Deny: “Allow”
Object: “WebForms”
Attribute: “*”
If, on the contrary, you wish to deny Read access to all web pages, define the permissions for the ACL as follows:
Access type: “Read”
Allow / Deny: “Deny”
Object: “WebForms”
Attribute: “*”
and
Access type: “Update”
Allow / Deny: “Deny”
Object: “WebForms”
Attribute: “*”
As may be guessed, the “*” in the attribute field means “all attributes.”
NOTE: Should you find it necessary to create new components, please contact PortaOne Support. We can provide you with a list of Object and Attribute resources, or otherwise assist you in maintaining ACLs.
From time to time you will find that the PortaBilling® predefined user ACLs (Admin, Helpdesk, and so on) offer too few, or too many, restrictions for a particular class of user. In such a case, it is time to create a new user ACL.
The easiest method is to take an existing access level and create a new one modeled on it, and then modify it to fit your needs. You should examine the permissions granted to the model access level, and verify that you want to grant access to those resources.
Next, you can include other components to suit your needs. As a style recommendation, we suggest that you first create a component containing the dependent components you wish to utilize.
Finally, create a new user ACL which includes only this new component. Now you can assign this ACL to new users.
The PortaBilling® ACL management system contains style conventions which you would be well-advised to follow:
We have already talked about the necessary parameters for creating or editing components, but we have not yet discussed component inclusion in detail. Each access level may have zero or more dependent components. These components are ordered, and likewise are applied in order until the first matching permission is reached. Keep in mind that the sequence of components matching is held top-down as shown on the screenshot:
 In order to
understand this better, we will use the previous example. Suppose a user
is trying to view ASR reports. His access level must allow reading of
“WebForms.ASR” (object “WebForms”, attribute “ASR”). For the sake of simplicity,
we will say that his access level includes “A”, “B”, and “C”, where “B”
allows this permission, but “C” explicitly denies it. In this case, the
user’s ability to view these reports is based on the ordering of these
components. If “B” appears before “C”, then it will work. In the opposite
case, he will not have access.
In order to
understand this better, we will use the previous example. Suppose a user
is trying to view ASR reports. His access level must allow reading of
“WebForms.ASR” (object “WebForms”, attribute “ASR”). For the sake of simplicity,
we will say that his access level includes “A”, “B”, and “C”, where “B”
allows this permission, but “C” explicitly denies it. In this case, the
user’s ability to view these reports is based on the ordering of these
components. If “B” appears before “C”, then it will work. In the opposite
case, he will not have access.
This may sound complex, but in practice the user interface is quite simple. Two columns are shown on the “Components” tab of the edit screen for each access level. On the left, you have a list of the available components, while on the right are the included components. Between these two columns you have the “Include->” and “<-Remove” buttons, which move selected items between the two lists. As for ordering, the “Up” and “Down” buttons on the far right-hand side of the screen allow you to rearrange selected elements of the “Included” column.
You should now have the skills necessary to implement the PortaBilling® security model and customize it to suit your business environment.
PortaBilling® is supplied with the following predefined ACLs:
| Name | Description |
|---|---|
Root |
This is a super user with delete, insert, read and update permissions to all of the PortaBilling® objects and their attributes.
When an administrator creates a new billing environment, the system assigns the Root user ACL to the initial user. |
Admin |
This is like the Root user, but has some limitations:
|
Bookkeeper |
This ACL means there is read-only access to billing information (tariffs, products). Users with this ACL can change balances for accounts / customers and block / unblock them. They do not have access to xDRs, but they do have access to reports. |
Helpdesk |
This ACL means there is read-only access to billing information (tariffs, products). Users with this ACL can modify customer and account parameters. This ACL also provides access to Trace Call. |
PortaBilling® is supplied with the following predefined ACLs for customers (or sub-customers):
| Name | Description |
|---|---|
Retail |
Access to xDRs, reports and invoices, ability to change customer information (such as password, address info etc), make online payments, access information about all accounts under this customer and view their xDR history. |
PortaBilling® is supplied with the following predefined ACLs for resellers:
| Name | Description |
|---|---|
Reseller |
Ability to set up online payment processors, change rates in the subscriber’s tariff, modify parameters of the subscriber’s product, create sub-customers and accounts under them, make online payments, and create CC staff accounts. |
Advanced Reseller |
Same as above, plus read-only access to customer’s own tariff (the tariff used by the PortaBilling® owner to charge the reseller). |
PortaBilling® is supplied with the following predefined ACLs for customer care administrators:
| Name | Description |
|---|---|
Customer Care |
Maintenance tasks, such as changing password and personal info, ability to see subcustomer, distributor and account information and change service parameters, give refunds (daily and transaction limits applied), make payments towards accounts and in favour of subcustomers and distributors, and trace a call and see the call details. |
PortaBilling® is supplied with the following predefined ACLs for vendors:
| Name | Description |
|---|---|
Vendor |
Access to CDR data and the vendor’s information. |
PortaBilling® is supplied with the following predefined ACLs for representatives:
| Name | Description |
|---|---|
Representative |
Read-only access to customer information, customer’s xDR records, and account information. |
PortaBilling® is supplied with the following predefined ACLs for accounts:
| Name | Description |
|---|---|
Account |
Access to xDR history, ability to change password and account info, make online payments and recharging using voucher. |
PortaBilling® is supplied with the following predefined ACLs for distributors:
| Name | Description |
|---|---|
Distributor |
Access to xDR history, reports and invoices, access to information about all accounts and customers, ability to change password and customer info, make payments towards accounts and customers, activate inactive accounts. |
In order to view a default ACL’s components and permissions, select Admin from the ACL.Mode list on the configuration server. We recommend that you set this option for a separate virtual environment in order to view information for predefined ACLs within this specific virtual environment only (i.e. the one used for experiments and tests). Then you can perform the following actions on the administrative web interface:
If this ACL contains any other components you can open them from the Access Level Management page and view their components and permissions.
The Access Level Management page within admin mode has some additional fields:
| Name | Description |
|---|---|
Dependencies |
This allows you to see the other ACLs that this particular ACL belongs to. |
Subsystem |
This is mainly used by the developers to define the subsystem an ACL belongs to. |
Group |
All ACLs are combined in groups depending on what area of the system an ACL is connected to. The Group column shows which group a particular ACL belongs to. |
Hidden |
When creating a new ACL, you can mark it as Hidden. Hidden ACLs will be visible in the ALC list to Root users only. Note: once defined, the Hidden status cannot be undone. |
Here’s an example:
Let’s say you need to assign an ACL to your new employees and you want to see exactly which rights they will have. In this case you would do the following:
Type Bookkeeper in the Name field and click Show ACLs.


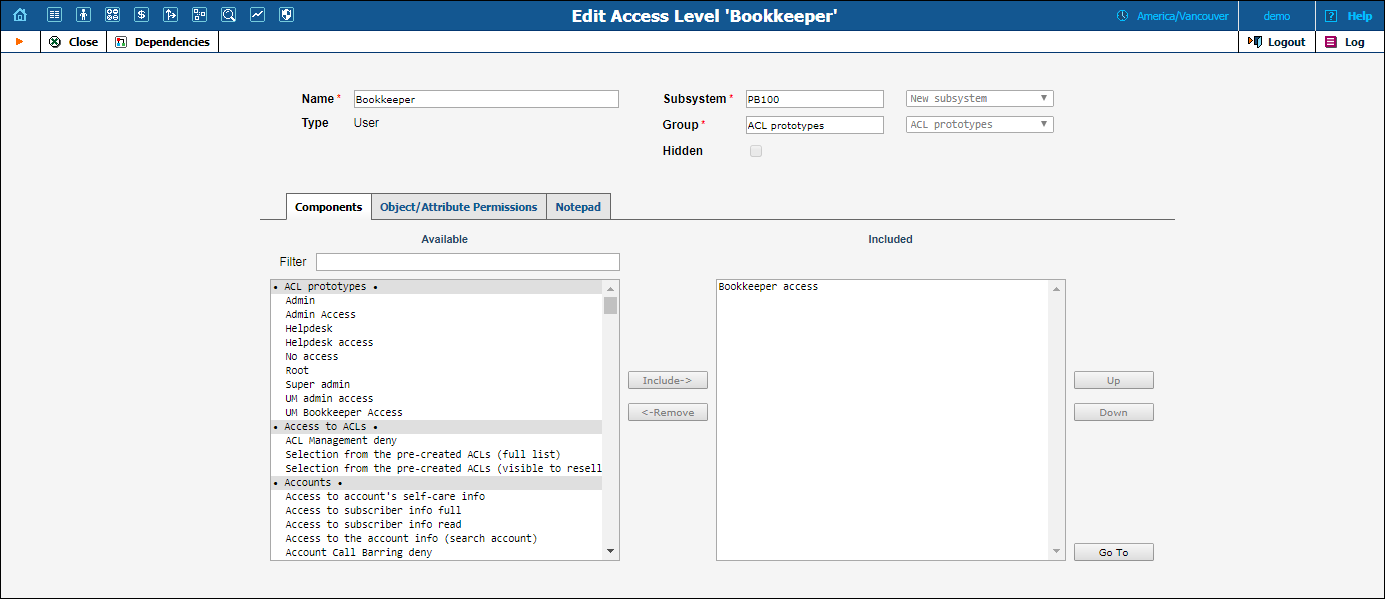
Open the Bookkeeper access ACL.

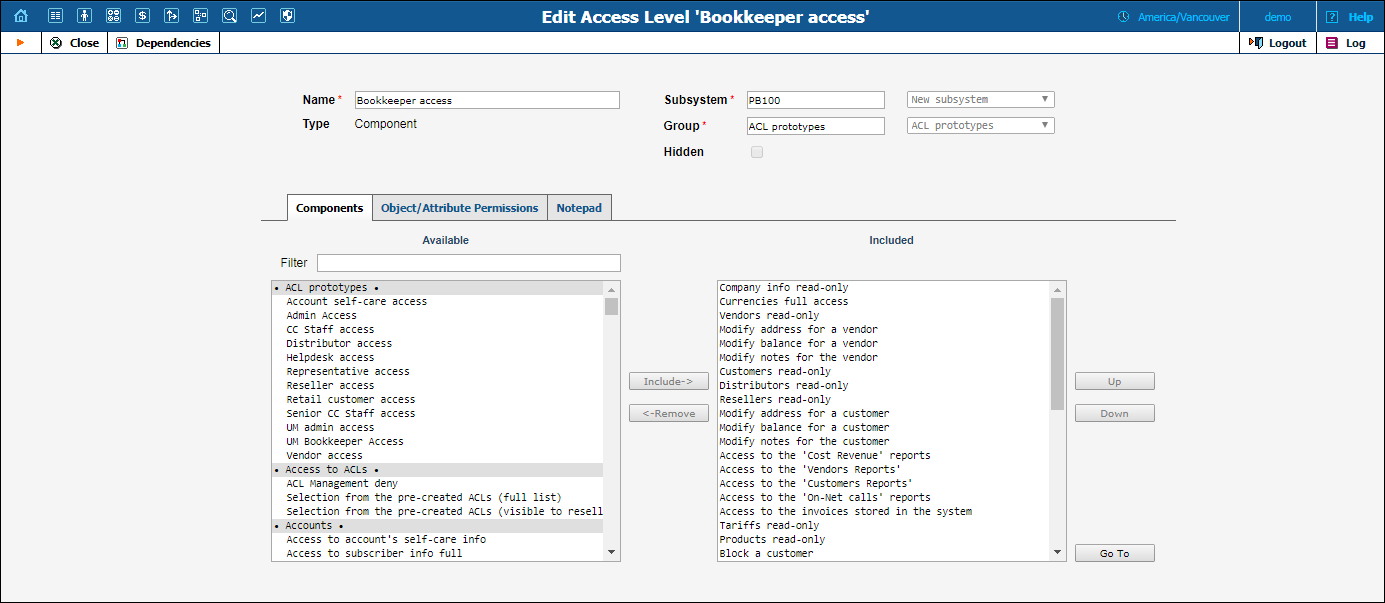
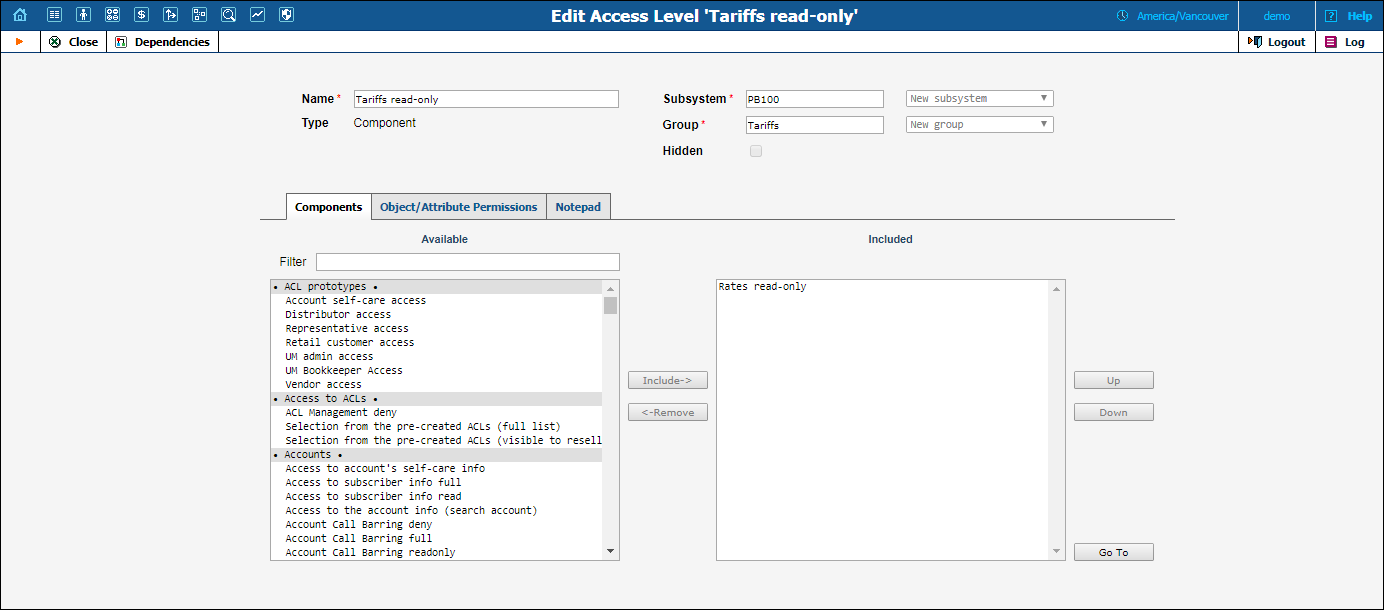
View all the components and make sure that the user will be able to view the tariffs but not modify them, and then open the Tariffs read-only component.
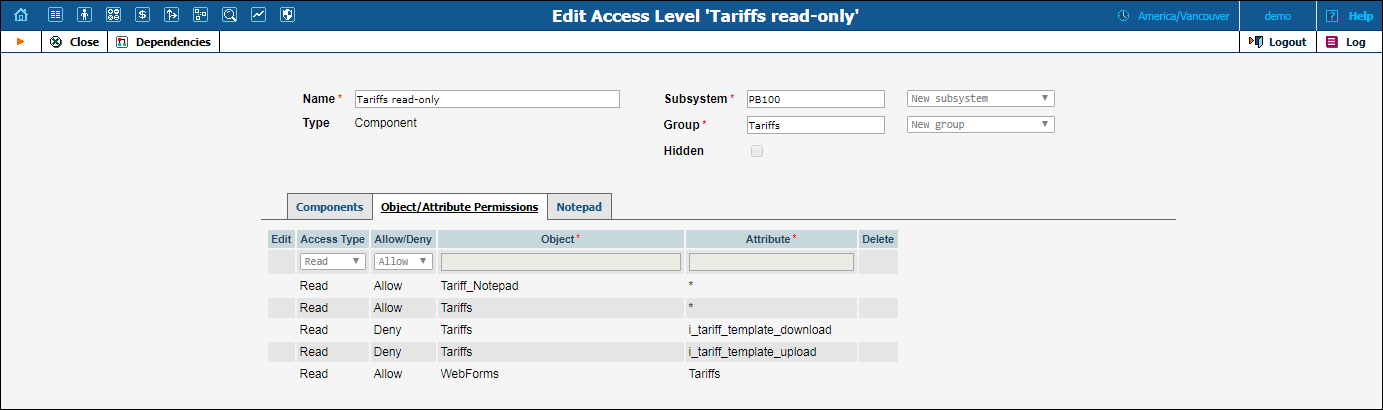
There you can see the following permissions:
| Access Type | Allow / Deny | Object | Attribute |
|---|---|---|---|
Read |
Allow |
Tariffs |
* |
Read |
Deny |
Tariffs |
i_tariff_template_download |
Read |
Deny |
Tariffs |
i_tariff_template_upload |
Read |
Allow |
Tariff_Notepad |
* |
Read |
Allow |
WebForms |
Tariffs |
There is one more component inside of the Tariffs read-only component: the Rates read-only component.
The Rates read-only component includes the following permissions:
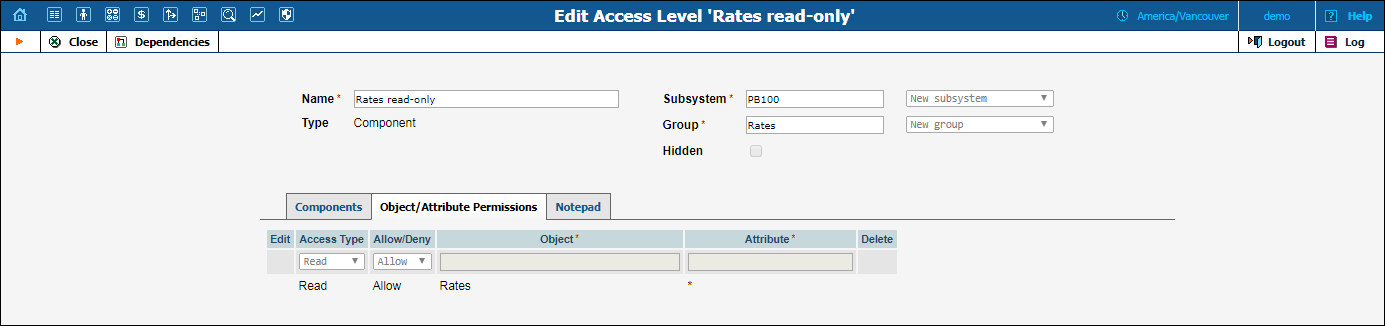
| Access Type | Allow / Deny | Object | Attribute |
|---|---|---|---|
Read |
Allow |
Rates |
* |
For system stability purposes, you may not edit default components and permissions. However, you may use them to create your own custom components and / or access levels and modify permissions within them.
You can assign a new individual set of default ACLs for each virtual billing environment. You can also assign a new set of default ACLs for all of the environments together. PortaBilling® remembers these settings and keeps them throughout system updates.
To override a PortaBilling® predefined ACL do the following:
When you override default ACLs for a virtual billing environment, the system behaves the following way:
You can override default ACLs for the following types of participants:
Note that some of these types of participants have more than one PortaBilling® predefined ACL. For example, there are two predefined ACLs for resellers: Reseller and Advanced Reseller. But when you override the PortaBilling® predefined ACLs, you can assign only one new default ACL per participant type.
You cannot redefine the PortaBilling® predefined ACLs for the User and the Component entities, i.e. the following PortaBilling® predefined ACLs:
In order to create an ACL for the customer / account self-care interface, follow these steps:
NOTE: You can use test customer / account in order to view the Objects / Attributes of the pages of the new self-care portal. In order to allow this customer / account to do this add the ID of the customer / account into the ACLTipsForAccounts or ACLTipsForCustomers field respectively on the Configuration server web interface.
Let’s take an example in order to see how to limit user access to certain pages of self-care portal. For example, if you would like to hide the Identity tab on the customer self-care interface, follow the steps below:
Using a test customer, go to the self-care portal and point the cursor at the exclamation mark near the Identity tab in order to see the Object / Attribute of this page (in our example, the Object is SelfCare and the Attribute is identity).

Attribute – identity
Now the Identity tab will be hidden on the customer self-care interface.
By default, only users with ACLs that contain the components Admin, Admin Access, Reseller and Reseller Access can see and use the Login with your own ACL option.
But even if required users don’t have this permission by default, it can still easily be granted to them. Just modify the users’ ACLs following these steps:
 Add
button.
Add
button. Save
to save this permission entry.
Save
to save this permission entry.
Remember that by doing this, you automatically grant permission to all users with this access level. If you want to grant permission to only some of the users, create a separate access level entry, modify it as described and then assign it to the users that you want to have this permission.