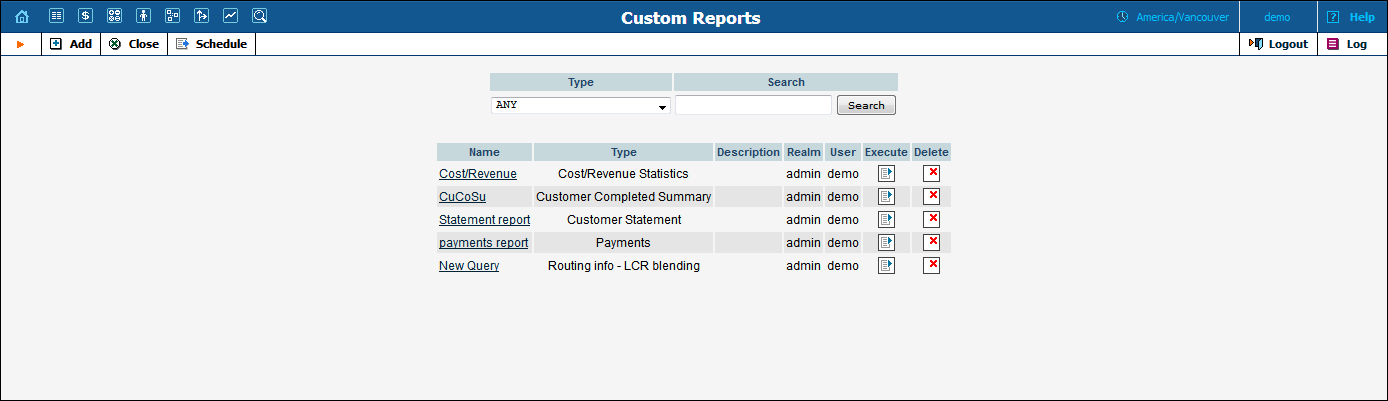
The Custom Reports section allows you to manage and execute custom report queries.
On the initial Custom Reports page, you can view already existing reports.
To execute one of them and see the result immediately, click the  Execute icon
for a particular report.
Execute icon
for a particular report.
Click the  Schedule
button on the toolbar to see information about scheduled report execution.
Schedule
button on the toolbar to see information about scheduled report execution.

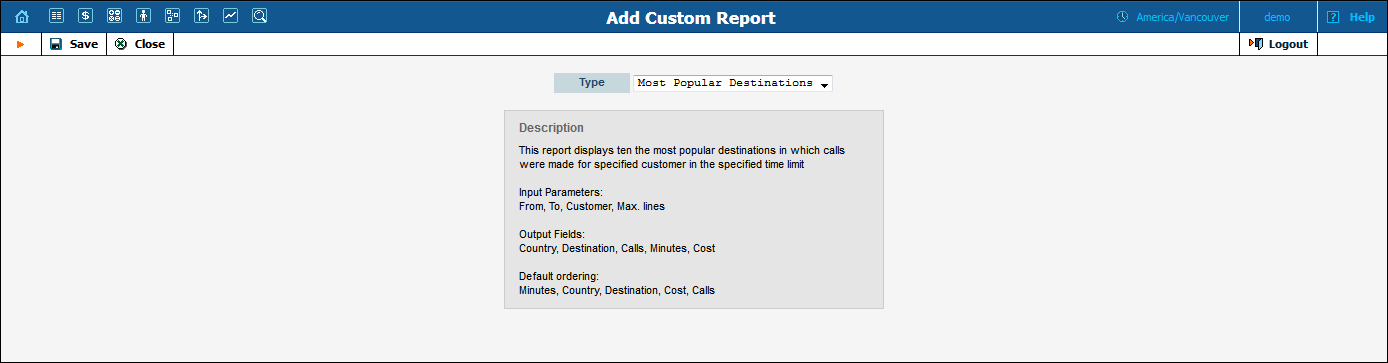
To create a new report, click  Add and choose the type of the report (one of the pre-defined
types). Click
Add and choose the type of the report (one of the pre-defined
types). Click  Save
to proceed in defining the report.
Save
to proceed in defining the report.
Type in a descriptive name for the new report. This is the name that will be displayed on the Custom Reports page.
Choose the time zone that will be applied to the date ranges of the report execution. This time zone will be applied to the date(s) in the report execution results and will also appear in the filename with the result report. Keep in mind that the user’s time zone will be applied to all the execution dates ( Start Time , Last Run and Completion Time ).
If the time zone for the report execution coincides with the user’s time zone, you can simply set the time zone to Auto . In that case, the report will be executed in the user’s time zone.
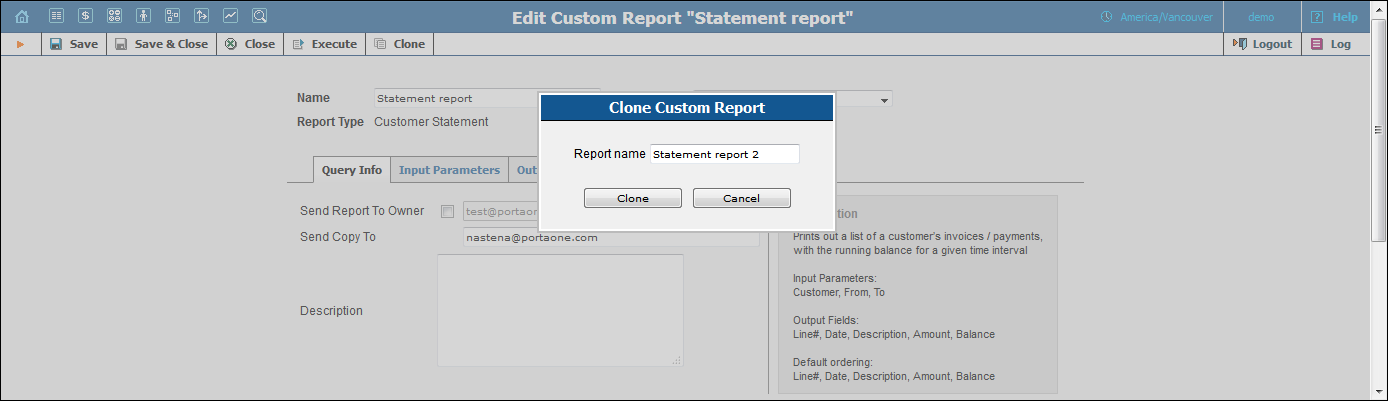
You can also create a new custom report as a clone of an existing one.
For this, open the report you want to clone and click the  Clone button. The cloned
report inherits all of the parameters from the original report and can
then be customized as desired.
Clone button. The cloned
report inherits all of the parameters from the original report and can
then be customized as desired.
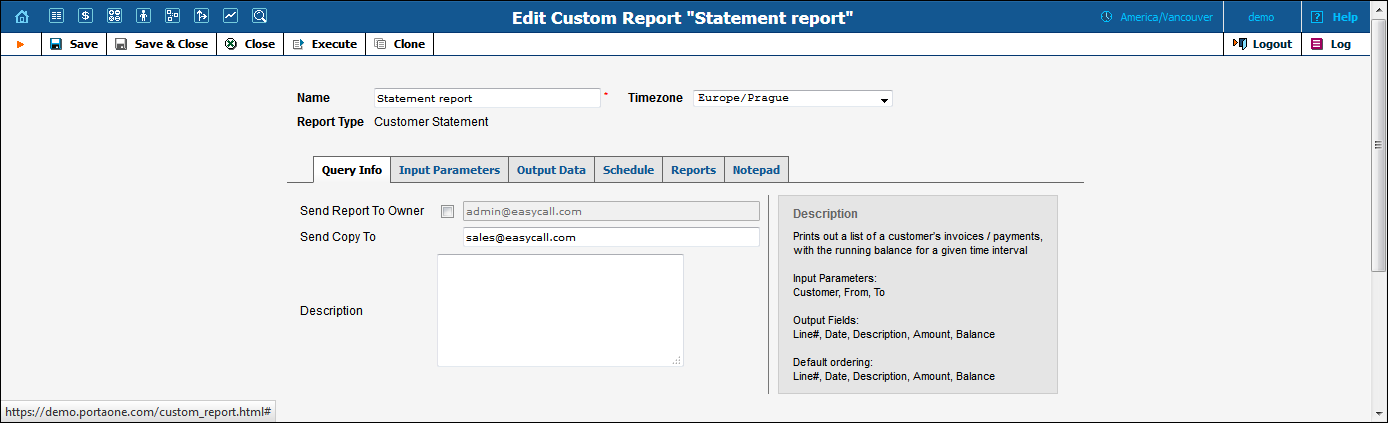
On the Edit Custom Report page, you can alter various parameters of this report.
Click the  Execute
button on the toolbar to run the report and immediately see the result
in your web browser.
Execute
button on the toolbar to run the report and immediately see the result
in your web browser.
| Field | Description |
|---|---|
Send Report To Owner |
If this check box is selected, after every query execution the user who executes the report will receive a copy of the report result by email. (Make sure you have defined your email address in the user settings.) |
Send Copy To |
Send a copy of the report result to another email address. |
Description |
General description of this report. |
The content of this tab is based on a particular report, and allows you to manage report parameters, e.g. for “Most popular destinations” you are able to specify the date range and customers.
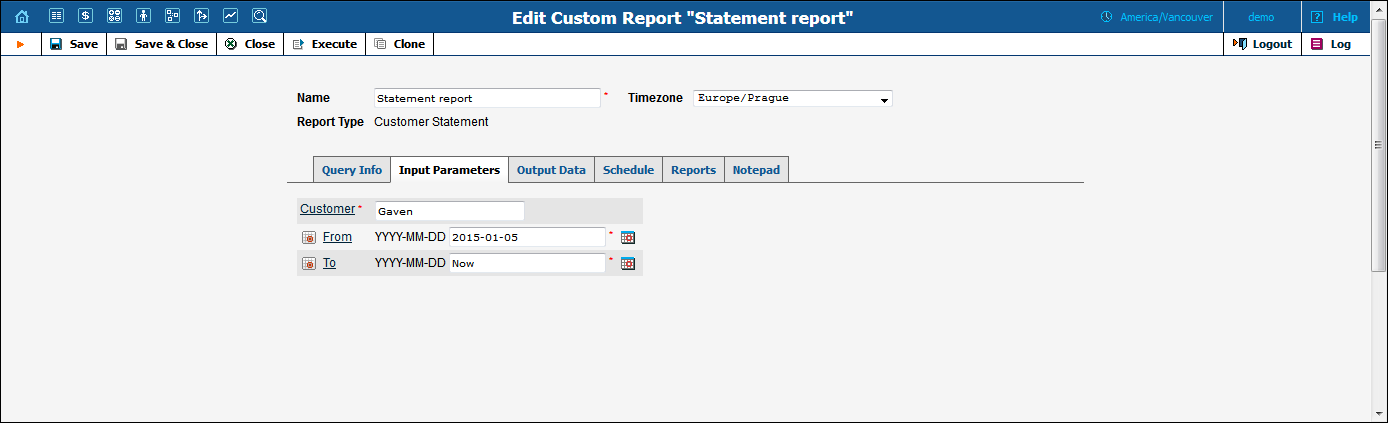
For input parameters which contain date / time values, there are two methods of entering values:
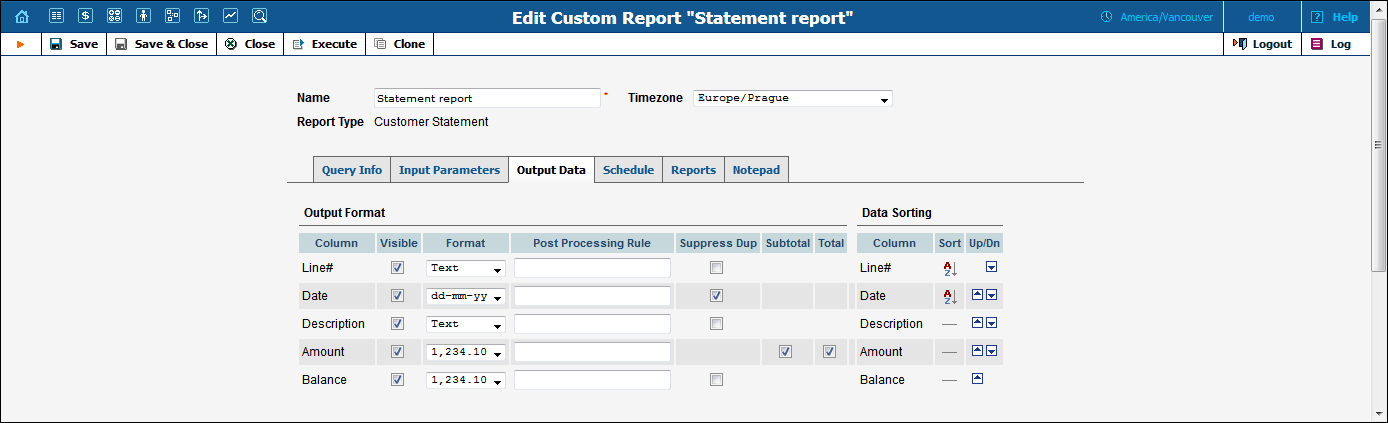
This tab includes two separate areas: Output Format, where you can define how the values of columns should be presented in the report, and Data Sorting, where you define how the report data should be sorted.
| Field | Description |
|---|---|
Column |
Name of the report column. |
Visible |
Whether this column should be included in the report. If you uncheck this option, the given column will simply be skipped in the report result. |
Format |
Formatting of the column data (e.g. whether the total number of minutes should be displayed as 380 or 380:00). |
Post Processing Rule |
This field functions like the post-processing rules in templates (for more details, see the PortaBilling Templates Guide). It allows you to modify the actual value extracted from the database before it is shown in the report. For instance, if the value in the database gives the total number of seconds, you can divide it by 60 to display the value in minutes to the user. |
Suppress Dup |
If activated, duplicate column values in adjacent rows will not be displayed – see the example below. |
The Suppress Duplicates option allows you to make your reports more readable by removing excess information. Compare the two datasheets below, in which the same data is shown, but where the right one has Suppress Duplicates enabled for certain columns.


| Field | Description |
|---|---|
Column |
Name of the report column. |
Sort |
Specifies the sorting mode for this column:
|
Up / Down |
If there are multiple columns used in sorting, their order
is very important. Here you can arrange the sequence of the sort
columns. For instance, if you want to sort data first by country
name and then by the number of minutes, use the |
This tab allows you to schedule automatic report execution (single time or periodic) in the future, and to see when a report was last generated.
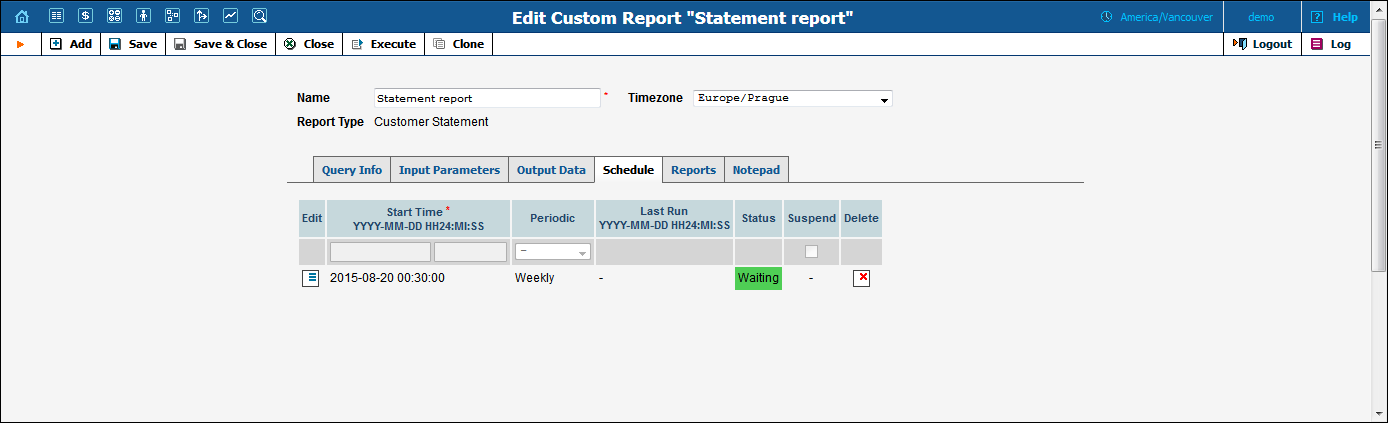
Click the Add
button on the toolbar to add a new entry.
| Field | Description |
|---|---|
Start Time |
Date and time when the report should be produced. |
Periodic |
Specifies whether the report should only be produced once, or generated every day, week or month. |
Last Run |
The date when the report was last executed (if applicable). |
Status |
Current status of the report:
|
Suspend |
Allows you to temporarily disable report execution (but not delete the entry from the report schedule). This may be convenient if you are leaving for vacation and would like to avoid having reports piling up in your inbox during your absence. |
NOTE: Start Time specifies only the “preferred” start time for the report. Report execution will not start earlier than the specified time, but it may start later if there are some other conflicting tasks at the specified time. For instance, if two reports are scheduled to be executed at 06:00, only one of them will start at that time, while the other will start only after the first one has finished.
This tab allows you to browse results for the ten previous report executions. Thus, if you did not save the original result, you do not have to run the reports over again.
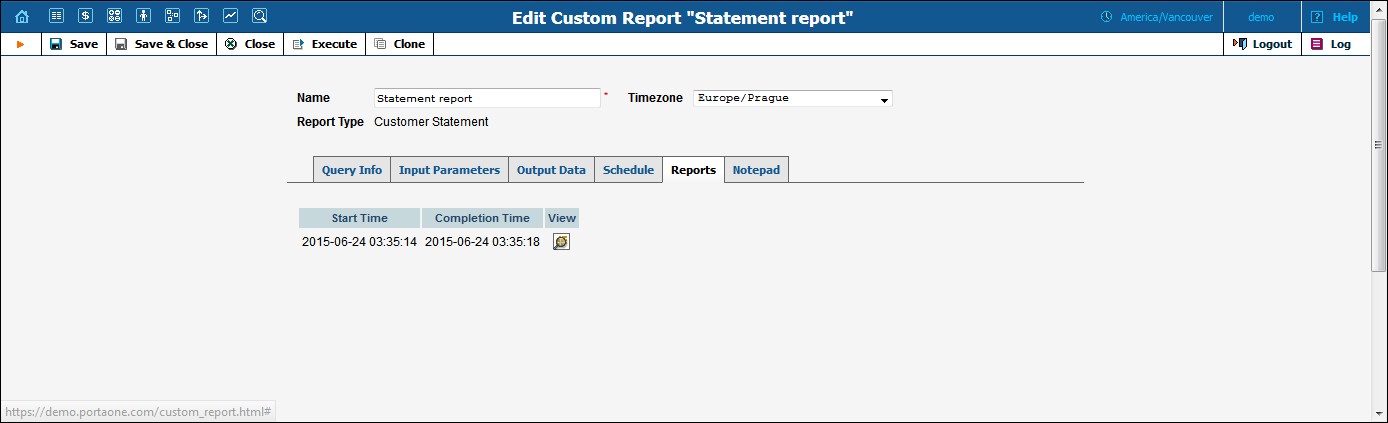
Click the  View
icon to see the corresponding file.
View
icon to see the corresponding file.
 From
A to Z – Data is sorted in ascending order
(i.e. Andrew will be at the top of the list,
and Zack at the bottom).
From
A to Z – Data is sorted in ascending order
(i.e. Andrew will be at the top of the list,
and Zack at the bottom). From
A to Z – Data is sorted in descending order (i.e.
Zack will be at the top of the list, and
Andrew at the bottom).
From
A to Z – Data is sorted in descending order (i.e.
Zack will be at the top of the list, and
Andrew at the bottom). Dash
– This column is not used for data sorting at all.
Dash
– This column is not used for data sorting at all. and
and  arrows
to move the Country column above the Minutes
column.
arrows
to move the Country column above the Minutes
column.