- Contents
You are viewing a document related to an older software Maintenance Release%XX%. Click here to see the latest version of PortaSwitch
Auto Attendant
On the Auto Attendant page you can program your own set of menus for auto attendant, from a simple message such as “I am on vacation right now, press 1 to connect to my assistant” to a complex menu system with various options for small or medium-sized businesses. You can program the voice dialog from your web browser, record voice prompts using a microphone on your PC or upload professionally recorded prompts, create multiple sub-menus and define an activity period for each of them, program your company’s dial-by-name directory, construct multiple call queues, and so on.
Note, that this page is only active if your provider has enabled the Auto Attendant service for you (otherwise it will be grayed out). Depending on your needs, you may activate / deactivate the Auto Attendant by selecting or clearing the check-box on the top.
Basic Concept
-
The Media Server’s auto attendant is composed of a set of menus.
-
All the menus are identical in every respect, except for the ROOT menu, which is always present and cannot be deleted, and whose name cannot be changed.
-
When a caller dials the system, auto attendant will answer (connect) the call and proceed to the ROOT menu.
-
If a user tries to access a menu which is not currently active, the action specified in the Not Active configuration parameter will be performed; for instance, the user may be automatically forwarded to an “after hours” menu.
Add / Edit menu
The auto attendant is composed of a set of menus. The main page lists
all the menus available. You can modify one of the existing menus by clicking
the  Edit
icon or by simply double-clicking the required menu item in the list.
Edit
icon or by simply double-clicking the required menu item in the list.
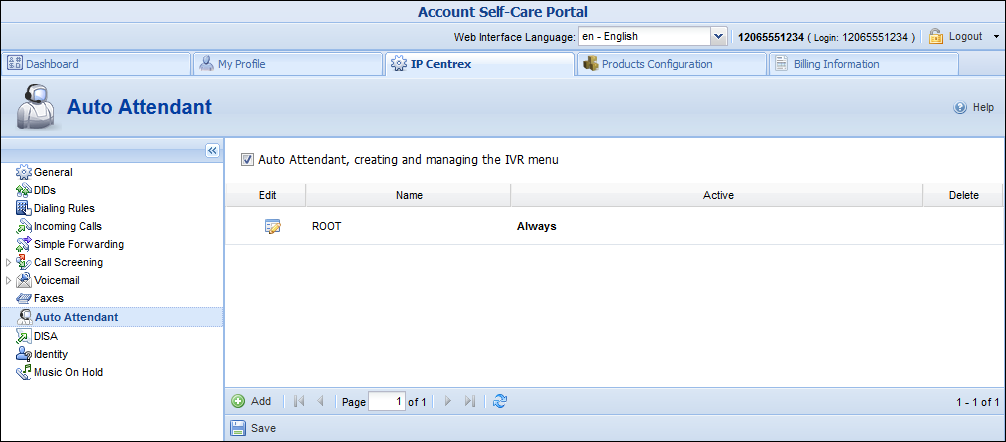
To add a new menu, click the Add button and enter the following information:
-
Name – A descriptive name for the menu, i.e. ‘Sales’ for a sales department.
-
Active – Time definition when the current menu is active.
-
To set the menu as always active, select the Always option.
-
To set the other time period, select Only at the following time interval and click the
 PeriodWizard
icon.
PeriodWizard
icon.

Period Definition Wizard
The following example shows how to create a period that starts at 6 pm every day and lasts until 6 am the next morning. Another interval is used for weekends. We will also include major holidays, e.g. January 1 and December 24–26.
On the Period Definition page, select 18:00 as the Start Time and 06:00 as the End Time. Click the Select All Days button to include all the days of the week and the Select All Month button to include all the months of the year. Click the Include New Period button. This sets up the first period.
Now for weekends: select 00:00 as the Start Time and 23:59 as the End Time. Select the check box next to Saturday and Sunday to include the week-end and click the Select All Month button to include all the months of the year. Click the Include New Period button. This sets up the second period.
To include January 1st in the period definition, select 00:00 as the Start Time and 23:59 as the End Time. In the Day of the Month field, enter 1 and select the check-box next to January. Click the Include New Period button. Follow the same steps to select the December 24–26 interval. When you are done, click the Finish button.
The following should be displayed in the Only at the following time interval:
From 18:00 Till 06:00,
on Sunday-Saturday,
of January-December
or
From 00:00 Till 23:59,
on Sunday, Saturday,
of January-December
or
From 00:00 Till 23:59,
on 1,
of January
or
From 00:00 Till 23:59,
on 24-26,
of December
Click the Save button.
Prompts
After you have saved a menu, you can define the Intro and Menu prompts for it.

-
The Intro prompt (e.g. “Welcome to PortaOne, a VoIP solutions company!”) is played when a user enters a menu for the first time.
-
After this, the Menu prompt will be played, listing all the available options (e.g. “Press 1 for sales, press 2 for technical support”), and auto attendant will collect the digits dialed by the user on his phone touchpad.
-
If no input is received, the Timeout prompt is played as many times as specified and the dialog reverts to the previous step (i.e. plays the Menu prompt and collects the user’s input).
To upload a prompt, click the Browse button. The native audio file format for the system is the following:
Type: NeXT/Sun (Java) file .au
Format: G.711 u-Law
Attributes: 8,000 Hz, 8-bit, Mono
Type: NeXT/Sun (Java) file .au
Format: G.711 u-Law
Attributes: 8,000 Hz, 8-bit, Mono
Here’s a short list of supported audio file formats:
| Field | Description |
|---|---|
|
.aiff |
AIFF files used on Apple IIc/IIgs and SGI |
|
.au |
SUN Microsystems AU files |
|
.gsm |
GSM 06.10 Lossy Speech Compression |
|
.mp3 |
MP3 Compressed Audio |
|
.ogg |
Ogg Vorbis Compressed Audio |
|
.raw |
Raw files (no header) |
|
.wav |
Microsoft .WAV RIFF files |
To record a prompt, use the following buttons:
-
 Record
– Click to start recording your voice prompt. (You will need to connect
a microphone to your computer’s sound card to use this feature.)
Record
– Click to start recording your voice prompt. (You will need to connect
a microphone to your computer’s sound card to use this feature.) -
 Stop –
Click this button to stop recording.
Stop –
Click this button to stop recording. -
 Play –
Click to play back the recorded prompt. When clicked, this icon will
turn into a
Play –
Click to play back the recorded prompt. When clicked, this icon will
turn into a  Pause
Pause -
 Undo –
This button becomes available when the existing prompt has been recorded
over, allowing a rollback to the previous state.
Undo –
This button becomes available when the existing prompt has been recorded
over, allowing a rollback to the previous state. -
 Blinking
Play – Indicates that the existing prompt is being overwritten,
but changes have not yet been saved.
Blinking
Play – Indicates that the existing prompt is being overwritten,
but changes have not yet been saved.
Each of the icons above may appear dimmed, meaning they are not available because some other task is active.
To give your auto attendant a professional sound, we recommend using a professional speaker and a digital recording studio when recording voice prompts.
Actions
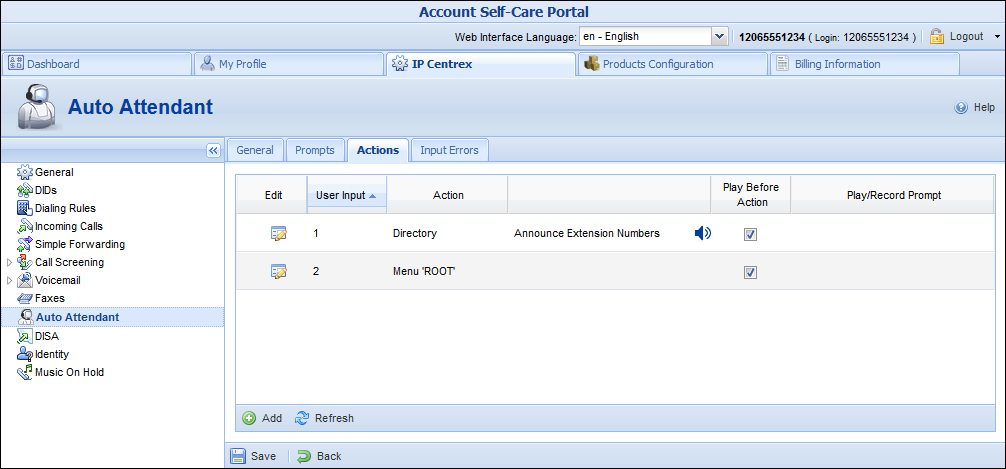
| Field | Description |
|---|---|
|
Edit |
Click the |
|
User Input |
|
|
Action |
See the description of available actions below, under the table. |
|
|
Provides additional information. |
|
Play Before Action |
Select this check box if the corresponding prompt is to be played before an action is performed. |
|
Play / Record Prompt |
File name and path for the prompt file. |
 Edit
icon to make changes in the action.
Edit
icon to make changes in the action.
The user’s input will be matched with the corresponding menu items, and the action associated with this item will be performed. The following actions are possible:
-
Default – Plays the Default prompt from the current menu and returns to the “Play Menu prompt” step (this is the action used for all menu items where the initial value has not been modified).
-
Transfer – Transfers the call to a given telephone number or extension. The phone number should be entered in the same format as the customer would use to dial it from an IP phone in his IP Centrex environment; for example, to transfer a call to extension 123, simply enter 123.
-
Transfer to E.164 Number – Transfers the call to a given number. The number should be specified in E.164 format: the country code, followed by the area code, and then the number (e.g. 16045551234 for Canada).
-
Dial extension directly – Transfers the call to an extension number entered by the caller from his phone. The extension number should start with the same digit as the “Dial extension directly” option. To prevent abuse (e.g. someone attempting to enter a long-distance number in this way), you can specify the maximum allowed number of digits in an extension (Max Size).
-
Prompt for extension # – You will hear the prompt to enter the extension number. You can specify the maximum allowed number of digits in an extension (Max Size).
-
Transfer to Voicemail – Switches to voicemail mode. This should be designated as an action for the “Fax” event, in order to allow storage of received faxes.
-
Menu“ROOT” – Transfers the user to the selected menu.
-
Directory – Launches this company’s dial-by-name directory.
-
Disabled – Cancels the action that was previously used for the current user input.
You may select whether the corresponding Before Action prompt is to be played prior to the action.
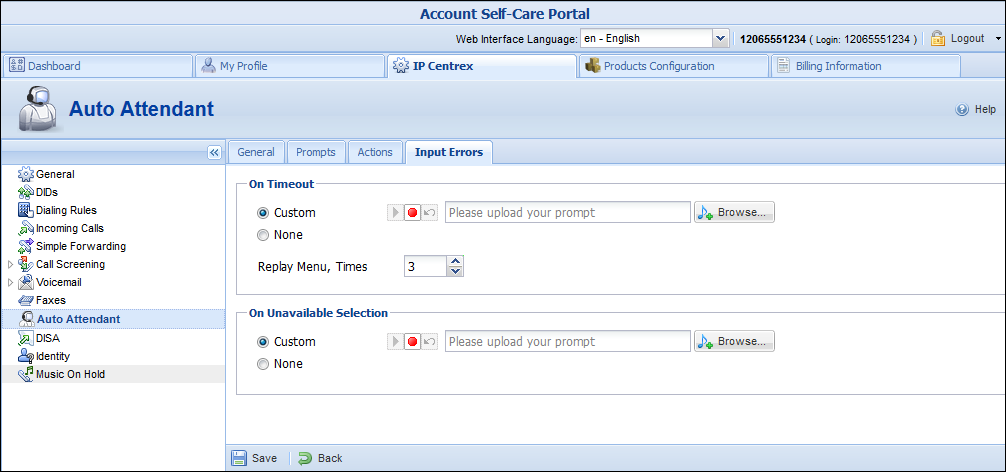
Input Errors
On the Input Errors page you can record / upload the Timeout and UnavailableSelection prompts. For detailed instructions on how to do this, please refer to the Prompts section of this document.
You may also specify how many times the auto-attendant menu should be played when there is no input. The default value is 3.