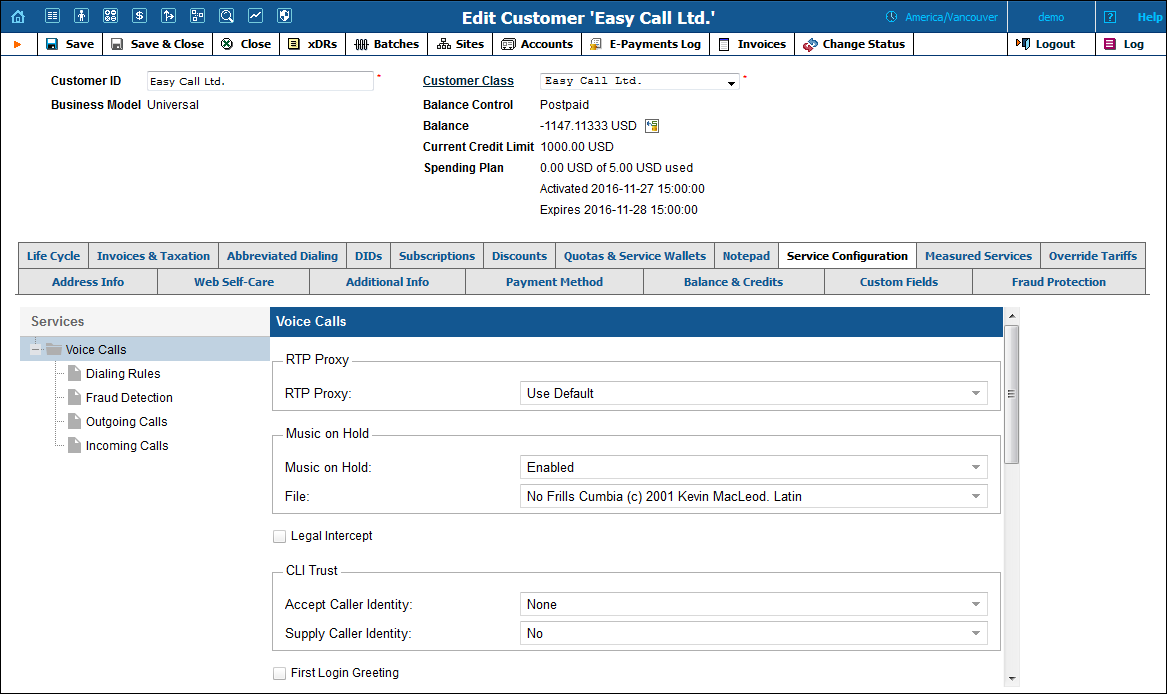
Using this tab, the administrator can activate / deactivate various features of the voice calls service provided to customers. Note that features are defined per service type (the physical service provided to the user) rather than per service (the name used in the billing configuration and “visible” to the end user). Thus if you decide tomorrow to bundle your VoIP services under a different name, and create a new service called “Internet Telephony” rather than the old name, “Voice Call”, you do not actually have to change the configuration settings for any of your customers.
The Services menu on the left allows you to select for which groups of service features you would like to define parameters.
| Field | Description |
|---|---|
Legal Intercept |
Intercepts all incoming and outgoing calls of this customer for law enforcement purposes. |
First Login Greeting |
When a new account (phone number) in this IP Centrex environment is provisioned and registers for the first time, call this phone back and play a pre-recorded voice message confirming service activation, giving information about various available options, and so on. |
RTP Proxy |
|
RTP Proxy |
This specifies the RTP proxy policy for this customer. For a description of possible values, refer to the Calls to/from Vendor connections with Voice Calls service type section. |
CLI Trust |
|
Accept Caller Identity |
|
Supply Caller Identity |
|
Music On Hold |
Defines the music on hold to be used with the IP Centrex environment. |
Music On Hold |
|
File |
Defines the music on hold to be used with the IP Centrex environment.
In the Upload New Music dialog box, select a file on your local file system using the Browse button. To rename the music, enter the desired name in the Music Name field; otherwise the local file name will be used. Then click Upload.
The uploaded music will replace the previous entry in the list, and is usually enabled within 10 minutes. It also appears in the list of available MOH files and you can assign it to another customer.
For a list of supported audio file formats, see Audio File Formats Supported by Music on Hold Feature. |
Call Parking |
|
Call Parking |
|
Park Prefix |
The end user can dial this access code to park a call.
The default value is *70.
This access code is available only if call parking is enabled for the customer.
Read-only field. For information about how to configure Park Prefix, please see the Service Codes table on the Dialing Rules Wizard page. |
Release Prefix |
The end user can dial this access code to retrieve a call from the parked status.
The default value is *71.
This access code is available only if call parking is enabled for the customer.
Read-only field. For information about how to configure Park Prefix, please see the Service Codes table on the Dialing Rules Wizard page. |
Limit simultaneous calls |
|
Limit simultaneous calls |
Engage real-time checks of the number of concurrent calls made by this customer’s accounts. When the specified number of concurrent calls has already been established (calls are in a “connected” state) and the account tries to place another call, that call will be rejected.
NOTE: To enable the Limit Simultaneous Calls feature, activate the send_start_acct option for the corresponding PortaSIP instances on the Configuration Server. To increase the features accuracy, activate the allow_reauth option too. Note that these features may slightly increase the load on the billing engine. |
Count: |
|
allow no more than ... forwarded calls |
Define a maximum number of concurrent forwarded calls allowed for this customer’s accounts. This limit is only applied when calls are forwarded to external numbers. |
allow no more than ... incoming calls |
Define a maximum number of concurrent incoming calls allowed for this customer’s accounts. |
allow no more than ... outgoing calls |
Define a maximum number of concurrent outgoing calls allowed for this customer’s accounts. |
out of ... simultaneous calls |
Define a maximum number of total concurrent calls (regardless of their type, such as incoming, outgoing or forwarded) allowed for this customer’s accounts. |
Codec connectivity profile |
Select a suitable codec connectivity profile that will be used for bandwidth allocation calculation. Every new call’s allocated bandwidth is calculated by considering a negotiated codec and its parameters to enable full use of the available bandwidth and block new calls if no more bandwidth is available. |
Max bandwidth |
This allows you to configure the bandwidth utilization limitation to ensure that only an acceptable number of calls are allowed, in order to avoid severe degradation of the sound quality on calls in progress.
The system plays a 'limit reached' warning when allocated bandwidth is used up. NOTE: Playing warning prompts requires an additional 8 Kbps of bandwidth. Therefore, set aside a certain amount of bandwidth (about 8 Kbps) when you define the bandwidth limit.
Note that only external calls are scrutinized during bandwidth consumption calculation. |
Max incoming bandwidth |
This allows you to configure the bandwidth utilization limitation for incoming calls. |
Max outgoing bandwidth |
This allows you to configure the bandwidth utilization limitation for outgoing calls. |
| Field | Description |
|---|---|
Endpoint Redirection |
This allows the end user to configure call redirection on their SIP phones (if this feature is supported by the SIP phone). |
Ext-to-Ext Call Distinctive Ring |
For incoming calls from phones within the IP Centrex environment, use a ring pattern different from the default one. |
Sip Contact |
|
Sip Contact |
Enable this feature to define the way a SIP device will perform SIP registration to PortaSwitch®. |
Deliver Incoming Calls To |
Define whether the IP PBX address for delivering incoming calls is taken from the IP PBX registration account or specified directly in the Static Address field. |
Account |
This shows the customer’s IP PBX registration account.
This option is usually selected if a customer’s IP PBX is located at a dynamic IP address and can register only the main phone line (provisioned as the registration account in PortaBilling®) on the PortaSIP® server. |
Static Address |
Enable this feature if the customer’s IP PBX can’t perform SIP registration to PortaSwitch®. |
Use Original CLD |
Specify the destination number that calls will be routed to. If left blank, the number originally dialed will be used as the destination number. |
Host |
This contains the destination host the calls will be routed to. A customer’s IP PBX can be identified with one of the following options:
A valid domain name with configured DNS SVR records. In this case, PortaSIP® will round-robin through them. |
Transport |
Select the transport protocol (either TCP or UDP) that is used to deliver incoming calls. |
User-managed SIP addresses |
|
User-managed SIP addresses |
Define to which external SIP proxies the customer can forward calls using the SIP URI forward feature. |
Addresses |
Type IP addresses or hostnames of external SIP proxies here. Use one of the following formats:
A user-managed SIP address must be unique. Its value length should not be greater than the allowed maximum (255). |
Group Pickup |
|
Group Pickup |
The Group Pickup feature enables members of the same huntgroup to answer each other’s calls by dialing a Group Pickup Prefix.
To fine-tune a group pickup functionality, a customer can organize IP Centrex extensions into pickup groups. Pickup groups are based on huntgroups, i.e. huntgroup A with number 2000 can serve as primary pickup group for its extensions 123 and 456. At the same time extension 123 can also belong to huntgroup B with number 9999.
In this example, extension 123 has the following pickup options:
Note that group pickup must be enabled for the particular huntgroup as well.
In case no primary pickup groups are defined within the IP Centrex (e.g. a small company with only several staff members) any extension can pick up incoming calls of others by dialing only the pickup prefix. |
| Field | Description |
|---|---|
Override Identity |
|
Override Identity |
Here you can set options that an end user may use for an identity. If an end user applies an identity that does not belong among the options permitted, it will be replaced with an identity provided by an administrator. PortaBilling® provides several options for overriding identity information:
|
Batch |
This allows you to specify a batch (this field is only available when If Different From All Accounts In The Specified Batch has been selected). |
Huntgroup |
This allows you to specify a huntgroup (this field is only available when If Different From All Accounts In The Specified Huntgroup is selected). |
Site |
This allows you to specify a site (this field is only available when If Different From All Accounts In The Specified Site is selected). |
Identity |
Here you can specify a default value that will replace the account identity (or display number) when the identity used for the call in the RPID / PAI headers (or From header) is invalid. If not specified, the account ID will be used instead. |
Override Display Number |
This allows you to control the “Caller number” value that will be placed in the From: header and typically displayed on the called party’s phone display. The possible values are:
|
Override Display Name |
This allows you to override the caller name used by the calling account. The possible values are:
|
Paging / Intercom |
|
Paging / Intercom |
This allows you to enable the intercom feature for accounts under this customer.
An end user can dial a special service code before a phone number to establish an intercom connection (two-way communication using phone’s loudspeakers) with a colleague (within the same IP Centrex).
For information about how to configure Paging / Intercom Prefix, please see the Service Codes table on the Dialing Rules Wizard page. |
| Field | Description |
|---|---|
Dialing Rules |
|
Dialing Rules |
This permits you to enable / disable the dialing rules for this customer. |
Dialing Format |
|
Translate CLI on outgoing calls |
This permits you to translate the CLI number in outgoing calls based on the selected dialing format. |
Translate CLI on incoming calls |
This permits you to translate the CLI number in incoming calls based on the selected dialing format. |
Field |
Description |
|---|---|
Location Information |
In this section you can set the country that the end user is currently in or usually resides in (and thus this country will be treated as ‘safe’ when the system checks for fraudulent activity) and whether the end user is allowed to make calls from abroad. |
Location Information |
|
Allowed Mobility |
This option is available only when Location Information is set to Enabled. Specify whether the end user is permitted to make calls from abroad.
In this case, the call will be screened if it does not meet one of the following conditions:
|
Current Location |
This option is available only when Location Information is set to Enabled. Select the country from the list.
This is the user’s ‘default’ country, i.e. the country where the end user permanently resides. Calls made from this country will be treated as safe and legitimate even if this country is on the High-Risk list of the geo / fraud profile.
Calls made from other countries by stationary end users (Allowed Mobility is set to Stationary User (Permanent Location)) will be screened.
For example, the geo / risk profile assigned to an end user lists Myanmar as a high-risk country. But when an end user moves to Myanmar for a half- year business project, Myanmar can be assigned as the end user’s current location. Thus, the end user will be permitted to freely make calls from this new location, and you won’t need to create a separate geo / risk profile for them.
Note that if you leave this option blank, the system automatically tries to obtain its value upon first use of the account after its creation. This is done according to the following logic:
NOTE: To permit auto detection of the account’s location, on the Configuration server web interface go to the Admin node -> the Global environment -> the VoiceFraudProtection group and enable the Assign_Primary_Location option. |
Additional Info |
This option works if the user’s Current Location is set to France and contains the user’s location information that will be conveyed by PortaSIP® within the “P-Access-Network-Info” SIP header to comply with EU regulations.
The value for this option must be defined in the GSTNR1R2C1C1C3C4C5XX format, where:
|
 Wizard icon to
review the selected dialing rule.
Wizard icon to
review the selected dialing rule.